


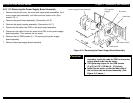


EPSON FX-2180 Service Manual Chapter 5 Adjustments
5-3
3.
Attach the print head to the carriage assembly again and tighten the
two CBS screws (3
×
10).
4.
Move the print head to the left end column position.
5.
Set the paper release lever to the single-sheet position.
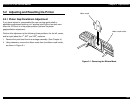
6.
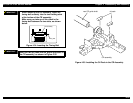
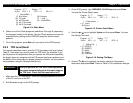
Loosen the hexagonal nut (M4) securing the PG adjustment lever and
set the PG adjustment lever to the second slot from the rear of the
printer mechanism, as shown in Figure 5-2.
PG SW2
PG adjustment slots
PG adjustment
lever
PG SW1
hexagonal nut
(M4)
Figure 5-2. Setting the PG Adjustment Lever
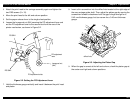
7.
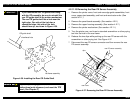
Hold the thickness gauge vertically and insert it between the print head
and platen.
8.
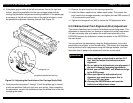
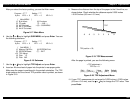
Insert a thin screwdriver into the drilled hole located at the right edge of
the rear carriage guide shaft. Then adjust the platen gap by moving the
screwdriver forward or backward until the gap is large enough for a
0.42 mm thickness gauge, but too narrow for a 0.45 mm thickness
gauge.
drilled hole
Figure 5-3. Adjusting the Platen Gap
9.
When the gap is correct at the left end column, check the platen gap at
the center and right end column positions.