


EPSON FX-2180 Service Manual Chapter 5 Adjustments
5-8
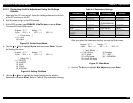
Program : J****** Setting : *****
9 pins VR 0 = 0 VR 1 = 0 VR 2 = 0
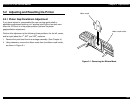
[ Main MENU ]
(1) Bi-d Adjust (6) Envelope
>(2) FF paper (7) ---- N/A ----
(3) A3 Cut sheet (8) -- SUB MENU
(4) A4 1P Cut sheet
(5) A4 6P Cut sheet
Figure 5-14. Main Menu
6.
Select one of the Check programs (selections 2 through 6) depending
on the paper loaded in the printer. Run the Check program to write the
selected factory settings to the EEPROM and print several check
patterns.
7.
To exit the program, press
Esc
until you return to the DOS prompt.
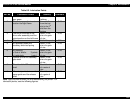
5.2.4 TPE Level Reset
This section describes how to reset the TPE (top paper end) level (value).
Table 5-1 lists when you need to reset the TPE level. For example, if you
do not perform this adjustment after you replace the PW sensor assembly,
the printer does not recognize that the PW sensor has been replaced, and
the ability of the new sensor to operate properly is limited. You can perform
this procedure using the Settings diskette only.
IMPORTANT
9
After you perform the TPE level reset adjustment,
the printer automatically prints the reset value for
the TPE level. Check that the reset value is FF.
1.
Make sure the PC is turned off. Insert the Settings diskette into drive A
of the PC and turn on the PC.
2.
Exit Windows and go to the DOS prompt.
3.
At the DOS prompt, type
GWBASIC J10a72v.bas
and press
Enter
.
You see the Printer Select menu.
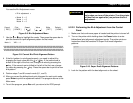
Program : J****** Setting : *****
9 pins VR 0 = 0 VR 1 = 0 VR 2 = 0
[ Printer select ]
> (1) 9 pins
(2) 24 pins
Figure 5-15. Printer Select Menu
4.
Use the
↑
or
↓
key to highlight
9 pins
and then press
Enter
. You see
the Setting File menu.
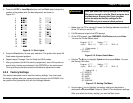
Program : J****** Setting : ******
9 pins VR 0 = 0 VR 1 = 0 VR 2 = 0
[ Setting File ]
> (1) DEFSTD
(2) EURSTD
(3) NLSP
(4) ITALIC
(5) RUSSIAN
Figure 5-16. Setting File Menu
5.
Use the
↑
or
↓
key to highlight the factory setting for the printer’s
destination and press
Enter
. Refer to Table 5-3 for destination settings.