


52
Using the BIOS Setup Utility
To recover the BIOS:
1 Turn off the system and disconnect the power cord, modem cord (if
installed), and all external peripheral devices.
2 Open the case (see “Opening the case” on page 17), observing the “Static
electricity precautions” on page 15.
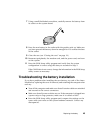
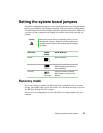
3 Remove the jumper from the J5K1 (see “System board” on page 5) and
set it aside. You will need it in a later step.
4 Close the case (see “Closing the case” on page 19), then reconnect the
power cords.
5 Place the bootable diskette containing the BIOS files into drive A:, then
turn on the computer.
At the start of the BIOS recovery process, the computer beeps once. The
recovery process may take a few minutes.
6 When you hear two beeps, the BIOS has been successfully recovered.
Remove the diskette from drive A:, turn off the computer, and disconnect
the power cord.
If you do not hear two beeps, the BIOS recovery was not successful. See
the troubleshooting section at the end of this procedure for further
information.
7 Open the case again (see “Opening the case” on page 17), observing the
“Static electricity precautions” on page 15.
8 Place the jumper back on pins 1-2 on the J5K1 jumper.
9
Close the case (see “Closing the case” on page 19), then reconnect the
power cords, and turn on the computer.
10
Enter BIOS Setup utility by pressing F1 when prompted during startup.
Once in BIOS Setup utility, press F9. The default settings for the BIOS
Setup utility are loaded.
11 Select a BIOS field that you want to change by using the
↑ (
up arrow)
and
↓
(down arrow) keys. Press E
NTER
, then reenter the values you wrote
down at the beginning of the BIOS update process.