


basics guide
print from a memory card
19
3 If you have not changed the default photo layout in the printer preferences,
you will be asked to select a layout for your photos. Since the layout setting
is ignored when you print a photo index, simply press the OK button to
continue. For information about changing the default photo layout, see
default photo layout on page 36.
The first photo on the memory card appears on the printer’s LCD screen.
4 Press the M
ENU button on the printer’s control panel.
5 Press the S
ELECT PHOTOS button until Print special is highlighted on the
printer’s LCD screen. Press the OK button.
6 Press the S
ELECT PHOTOS button until Print index is highlighted on the
printer’s LCD screen. Press the OK button.
A photo index showing all the photos stored on the memory card, up to a
maximum of 2000 photos, begins printing.
select photos to print
You can select one or more photos to print using the printer’s control panel.
select a photo
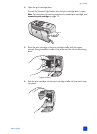
1 Insert a memory card into the printer’s memory card slot. For more
information, see insert a memory card on page 14.
Note: If you used your digital camera to select photos on the memory card,
a message appears on the printer’s LCD screen asking if you want to print
camera-selected photos. For more information, see print camera-selected
photos on page 26.
2 If you have not changed the default photo layout in the printer preferences,
you will be asked to select a layout for your photos. Press the S
ELECT
P
HOTOS or button to highlight the photo layout you want to print,
then press the OK button. For information about changing the default
photo layout, see default photo layout on page 36.
The first photo on the memory card appears on the printer’s LCD screen.
3 Press the S
ELECT PHOTOS or button to navigate to the photo you want
to select.
Tip: To move quickly through the photos, press and hold the S
ELECT
P
HOTOS or button.
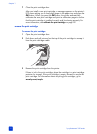
4 When the photo you want to select appears on the printer’s LCD screen,
press the OK button to select it.
A small printer icon appears in the bottom left corner of the
photo on the printer’s LCD screen to indicate that the photo has
been selected. The default number of copies and an icon
showing the current photo layout also appear at the bottom of the photo. In
addition, a green crop box is displayed around the photo to indicate the
portion of the photo that will be printed. A message telling you the photo is
selected for printing appears briefly.
5 To select additional photos to print, repeat steps 3 and 4.