


hp photosmart 240 series
chapter 5
40
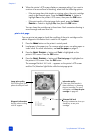
extend colors
You can set the printer to automatically deepen and intensify the colors in the
photos you print. Extending colors is a good way to improve color photos that
look washed out or faded, but it will increase printing time and may not have a
noticeable effect on all photos.
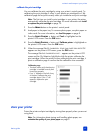
The printer’s factory default setting for automatically extending colors is Off. You
can change the default setting by following these steps:
1 Press the M
ENU button on the printer’s control panel.
2 Press the SELECT PHOTOS button until Preferences is highlighted on the
printer’s LCD screen. Press the OK button.
3 Press the SELECT PHOTOS button until Extend colors is highlighted on the
printer’s LCD screen. Press the OK button.
4 Select from the following:
– On if you want the printer to automatically increase the intensity of the
colors (color saturation) when it prints your photos.
– Off if you do not want the printer to adjust the color saturation when it
prints your photos.
5 With your selection highlighted on the printer’s LCD screen, press the OK
button.
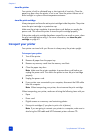
unmark camera-selected photos after printing
Camera-selected photos are photos you selected for printing using your digital
camera. When you select photos using your camera, the camera creates a
Digital Print Order Format (DPOF) file that identifies which photos have been
selected. For information about printing camera-selected photos, see print
camera-selected photos on page 26.
After printing camera-selected photos, you can choose to unmark (deselect) them
or to keep them marked so you can print the same set of photos again.
Unmarking the photos deletes the DPOF file from the memory card.
Note: Unmarking photos does not delete the photos from the memory card.
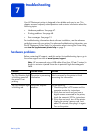
The printer’s factory default setting is to Ask if you want to unmark camera-
selected photos after they have been printed. You can change the default setting
by following these steps:
1 Press the M
ENU button on the printer’s control panel.
2 Press the SELECT PHOTOS button until Preferences is highlighted on the
printer’s LCD screen. Press the OK button.
3 Press the SELECT PHOTOS button until Camera selections is highlighted
on the printer’s LCD screen. Press the OK button.