


basics guide
print from a memory card
23
6 If you like, you can change the other print settings for the selected photo—
cropping, brightness, decorative frame, or color effect—as described in get
creative on page 29.
7 Press the P
RINT button to begin printing.
Note: If you press the C
ANCEL button during printing, the printer stops
printing but retains your photo selections and print settings.
Note: You can print a different number of copies of each selected photo by
using the C
OPIES + or – button as described in this section. If you do not
change the number of copies for a selected photo, the default number of
copies will print. The factory default for number of copies is one. For
information about changing the default number of copies, see default
number of copies on page 36.
print a continuous range of photos
You can print a continuous range of the photos stored on a memory card.
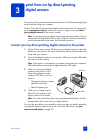
1 Insert a memory card into the printer’s memory card slot. For more
information, see insert a memory card on page 14.
2 If you have not changed the default photo layout in the printer preferences,
you will be asked to select a layout for your photos. Press the S
ELECT
P
HOTOS or button to highlight the photo layout you want to print,
then press the OK button. For information about changing the default
photo layout, see default photo layout on page 36.
The first photo on the memory card appears on the printer’s LCD screen.
3 Press the M
ENU button on the printer’s control panel.
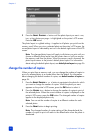
4 Press the S
ELECT PHOTOS button until Print special is highlighted on the
printer’s LCD screen. Press the OK button.
5 Press the S
ELECT PHOTOS button until Print range is highlighted on the
printer’s LCD screen. Press the OK button.
6 Press the SELECT PHOTOS or button until the first photo you want to
print appears in the left box on the printer’s LCD screen. Press the OK
button to select this photo as the beginning of the range of photos you
want to print.
The arrows move to the photo in the right box on the printer’s LCD screen
and you are asked to select the photo at the end of the range.
7 Press the S
ELECT PHOTOS or button until the last photo you want to
print appears in the right box on the printer’s LCD screen. Press the OK
button to select this photo as the end of the range of photos you want to
print.
The printer’s LCD screen displays the selected range of photos.
8 If you like, you can change the number of copies to print of the selected
range of photos by pressing the C
OPIES + or – button. Press the OK button
when the desired number of copies appears on the printer’s LCD screen.
9 Press the P
RINT button to begin printing.