


4
basics guide 29
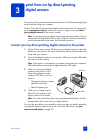
get creative
The control panel on your printer is designed to make photo projects fun and
easy. You can print more than one photo on each sheet of paper and print a
different number of copies of each photo. You can crop your photos, adjust the
brightness of your photos, add decorative frames and special color effects to
your photos, change the print quality, and view photo slide shows right from the
printer. The affordable projects are endless—just use your imagination!
For information about how to:
• Change the photo layout, see page 29
• Change the number of copies, see page 30
• Crop a photo, see page 31
• Adjust the photo brightness, see page 32
• Add frames to your photos, see page 32
• Change the photo color effect, see page 33
• Change the print quality, see page 34
• View a slide show, see page 34
All of the print settings described in this chapter, except for the photo layout and
print quality, are applied to individual photos and are discarded when you
deselect the photo.
You can also enhance your photos by setting the printer preferences. Printer
preferences are global settings—they apply to all photos that you print. You can
print borderless photos or photos with white borders, automatically improve
contrast and color saturation in your photos, or adjust your photos using Exif Print
information. For more information, see set printer preferences on page 35.
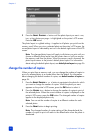
change the photo layout
When you first insert a memory card into the printer’s memory card slot, a
message appears on the printer’s LCD screen asking you to select the photo
layout. However, you can change the photo layout at any time using the M
ENU
button on the printer’s control panel.
1 Press the M
ENU button on the printer’s control panel.
2 Press the S
ELECT PHOTOS button until Change layout is highlighted on
the printer’s LCD screen. Press the OK button.