


basics guide
get creative
31
crop a photo
When you print from a memory card, you can use the printer’s control panel to
crop a photo so only your favorite portion of the photo prints.
1 Press the S
ELECT PHOTOS or button to navigate to the photo you want
to crop. When the photo you want to crop appears on the printer’s LCD
screen, press the OK button to select it.
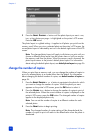
2 Press the Z
OOM + button on the printer’s control panel.
Four arrows on the printer’s LCD screen blink briefly to indicate
that you are entering Zoom mode. The print settings at the
bottom of the display are replaced by the Zoom icon and
magnification level.
Note: Make sure to press the ZOOM + button first. If you press the ZOOM –
button first, the printer will exit Zoom mode and go to 9-up view mode. (In
9-up view mode, nine photos appear on the printer’s LCD screen at a time.)
To return to Zoom mode for the selected photo, press the Z
OOM + button
twice.
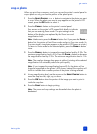
3 Press the ZOOM + button to increase the magnification level by 0.25x. The
maximum magnification level is 5.0x. Press the Z
OOM – button to decrease
the magnification level by 0.25x. The minimum magnification level is 1.0x.
Note: The crop box changes from green to yellow if printing at the selected
magnification will noticeably reduce the print quality.
Note: If you increase the magnification beyond 3.0x, the photo will no
longer be magnified on the printer’s LCD screen. Instead, the crop box will
shrink to indicate that a smaller portion of the photo is being selected.
4 At any magnification level, use the arrows on the S
ELECT PHOTOS button to
move the crop box left, right, up, or down.
5 Press the OK button when the portion of the image you want to print is
inside the crop box.
6 Press the P
RINT button to begin printing.
Note: The zoom and crop settings are discarded when the photo is
deselected.