


HP OmniBook 7100 Removal and Replacement 2-7
3. Reboot the computer. If you are using the Recovery CD, press ESC during reboot to cancel the
OmniBook screen, ESC to display the boot-device menu, then select the CD-ROM drive as the
boot device, and choose the diagnostics boot option.
4. When prompted, select “Create Hibernate Partition.”
We recommend that you create a 160-MB partition, the same as the factory setup.
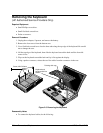
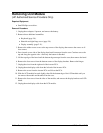
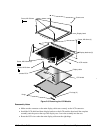
Replacing Small Parts
(User-Replaceable)
The following small parts are user-replaceable.
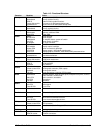
Table 2-6. Replacing Small Parts (User-Replaceable)
Part Replacement Procedure
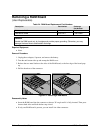
Battery Faceplate
Slide the panel to one side. Pry off the top edge next to the overhanging end, then
slide the panel to the opposite end and remove the panel.
Reassembly Notes: Attach the bottom edge of the panel first, then snap on the top
edge.
BIOS Cover
On the bottom of the unit, insert a flat-blade screwdriver into the slot at the edge of
the BIOS cover and pry it off.
Feet
Insert a small flat-blade screwdriver under the end of the foot and pry it loose. To
replace, firmly press the adhesive side of the foot into the recess.
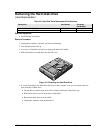
I/O Door
Open the door and flex the center of the door until one of the side tabs releases.
To replace an I/O door hinge, insert a small flat-blade screwdriver behind the middle
of the flat plate and pop the hinge out of the case. When installing a hinge, make
sure the hinge support curves downward.
Pointing Stick Cap
Pull the cap off the pointing stick.
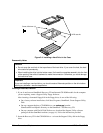
RAM Cover
On the bottom of the unit, insert a flat-blade screwdriver into the slot at the edge of
the RAM cover and pop it off.
Screw Cover
Use a small screwdriver or probe to pry out the screw cover on the display bezel. To
replace, firmly press the adhesive side of the cover into the hole.