


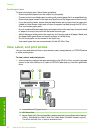
Connect to additional computers on a network
You can share the HP All-in-One on a network so that more computers can use it. If the
HP All-in-One is already connected to a computer on the network, you must install the
HP All-in-One software on the network for each of the computers. During the installation,
the software will discover the HP All-in-One on the network for each of the computers.
Once you have set up the HP All-in-One on the network you will not need to configure it
again when you add additional computers.
NOTE: You can connect the HP All-in-One to either a wireless or wired network, but
not both at the same time.
Change the HP All-in-One from a USB connection to a
network connection
If you first install the HP All-in-One with a USB connection, you can later change to either
a wireless or Ethernet network connection. If you already understand how to connect to
a network, you can use the general directions below.
NOTE: For optimal performance and security in your wireless network, use an
access point (such as a wireless router) to connect the HP All-in-One.
To change a USB connection to an integrated wireless WLAN 802.11 connection
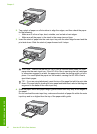
1. Unplug the USB connection from the back of the HP All-in-One.
2. Touch Setup on the display.
3. Touch Network.
NOTE: If the menu option you want is not visible on the screen, touch or
to scroll through all the menu options.
4. Touch Wireless Setup Wizard.
This runs the Wireless Setup Wizard.
5. Install the software for a network connection, choose Add a Device, and then choose
Through the network.
6. When the installation is complete, open Printers and Faxes (or Printers) in the
Control Panel and delete the printers from the previous USB installation.
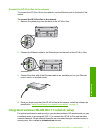
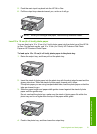
To change a USB connection to a wired (Ethernet) connection
1. Unplug the USB connection from the back of the HP All-in-One.
2. Connect an Ethernet cable from the Ethernet port on the back of the HP All-in-One
to an available Ethernet port on the router or switch.
3. Install the software for a network connection, choose Add a Device, and then choose
Through the network.
4. When the installation is complete, open Printers and Faxes (or Printers) in the
Control Panel and delete the printers from the previous USB installation.
Connect to additional computers on a network 15
Network setup