


●
Scan from the product (fax/photo-card model)
●
Scan from TWAIN-compliant or Windows Imaging Application (WIA)-compliant software
NOTE: To learn about and use text-recognition software, install the Readiris program from the
software CD-ROM. Text-recognition software is also known as optical character recognition (OCR)
software.
Scan from the PC
1. In the HP program group, select Scan to start HP LaserJet Scan.
NOTE: Pressing Start Scan on the product control panel also starts HP LaserJet Scan.
2. Choose the action that you want to accomplish.
●
Select a destination to begin scanning immediately.
●
Select Scan after prompting me for settings to specify additional settings before you begin
scanning.
●
Select Set up the device to program the Scan Menu button.
3. Click OK.
NOTE: OK should indicate the action that you want to accomplish.
Scan from the product (fax/photo-card model)
NOTE: In order to use the Scan Menu button, you must have performed the recommended installation,
and the button must have destinations set. See
Set up the product Scan Menu button on page 96.
In order to use the Start Scan button, the product must be connected to a computer via USB.
Scan directly from the product by using the control-panel scan buttons. Press Start Scan or Scan To to
scan to a folder (Windows only) or to scan to e-mail.
Use the Scan To feature (fax/photo-card model)
●
Scanning from the product control panel is only supported with a full software installation.
HP ToolboxFX must be running to scan by using the Scan Menu button or the Start Scan button.
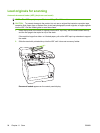
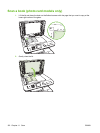
●
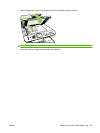
For the best scan quality, place your originals onto the flatbed scanner, rather than loading them
into the automatic document feeder (ADF) input tray.
●
The computer that is connected to the product must be turned on.
Set up the product Scan Menu button
Destinations must be set up prior to using the Scan Menu button on the control panel. Use HP LaserJet
Scan to program the folder, e-mail, and program destinations for scanning.
Set up destinations on the product
1. Click Start, click Programs (or All Programs in Windows XP), click HP, click the product, click
Scan, and then click Settings.
2. Select Change the destinations that show up on the all-in-one control panel.
96 Chapter 11 Scan ENWW