


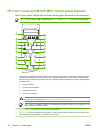


4 Cancel (X): Whenever the Ready light blinks, press to cancel a print job. Pressing this button also exits the
control-panel menus.
5 Right arrow (>): Press to navigate to the next submenu or the next value in the menu selection list. Also
allows cursor movement forward a single position, or increments a numeric entry.
6 Down arrow (v): Press to navigate to the menu item below the current menu item.
7 Start Photo: Press to print one or more photos.
8 Proofsheet: Press to print a proofsheet.
9 Start Scan: Starts scanning to the previously selected e-mail or folder destination. The MFP can also start
a scan if a destination is not specified.
10 # of Copies: Press the navigation arrows to increase or decrease the number of copies produced.
11 Lighter/Darker: Press Left arrow to lighten the copy or the Right arrow to darken the copy.
12 Press Start Copy Color to begin a color copy job.
13 Press Start Copy Black to begin a monochrome copy job.
14 Reduce/Enlarge: Displays a list of temporary copy and size changes.
15 Copy Features: Displays a menu of copy features.
16 Scan To: Displays a list of pre-configured folders and e-mail destinations. To create a new destination, set
up the Scan To destination on the workstation.
17 Select Photos: Press to choose one or more photos.
18 Photo Features: Press to navigate to select photo features.
19 Return to previous menu or menu item: Backs up one menu screen or one step in the current menu structure.
20 Left arrow (<): Press to navigate to the previous submenu or the previous value in the menu selection list.
Also allows cursor movement back a single position, deletes the previous character, or decrements a
numeric entry.
21 Menu: Opens the main menu system.
22 Ready light (green): Green light is steady when the MFP can accept print jobs or blinks when the MFP
receives print data.
23 OK:
●
Selects a menu item
●
Clears some printer-errors
●
Acknowledges use of a non-HP supply
22 Chapter 3 Control panel ENWW