


52
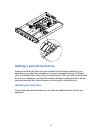
To install the hard drive in the mounting bracket
This procedure assumes that the mounting bracket has been removed from the
drives.
1. Place the drive in the mounting bracket with the component side down and
the front of the drive facing the front (tabbed) end of the mounting bracket.
2. Align the four mounting-bracket screw holes with the mating holes (two on
each side) in the drive housing.
3. Use a Phillips screwdriver and four screws to securely attach the mounting
bracket to the drive. Do not overtighten the screws; the bracket sides can
bend inward, which affects the alignment of the tabs with the slots in the
front panel.
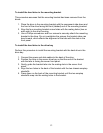
To install the hard drive in the drive bay
Perform this procedure to install the mounting bracket with the hard drive in the
drive bay.
1. Connect the power and data cables to the back of the drive.
2. Position the drive in the server drive bay so that the end of the bracket
with the tabs is facing the server front panel.
3. Gently guide the bracket tabs into the mating slots in the server front
panel.
4. Align the two holes in the back of the bracket with the two chassis snaptop
standoffs.
5. Press down on the back of the mounting bracket until the two snaptop
standoffs snap into the mating holes in the bracket.