


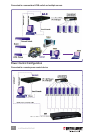
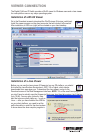

Conguration of the Firewall/Router for Access across the Internet
To allow access to the Digital KVM over IP Switch behind a corporate rewall/router, establish
the following settings on your rewall/router (not on your switch).
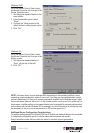
1. Congure a virtual server on your router (or ask your network administrator to do it) as
mapped to the switch’s local IP address.
2. Open a port range (<port_base> – <port_base_+_9>) both inbound and outbound for the
virtual server according to what has been previously congured as the port base for the
switch.
As per the previous example, if the switch is congured with a port base of 5970, then the port
range should be opened as 5970–5979 (i.e., <port_base> – <port_base +9>) both for inbound
and outbound, in which:
• for the switch’s viewer connection port: <port_base> = 5970
• for the browser SSL connection port: <port_base + 8> = 5978
• for viewer internal communication, etc.: <port_base + 9> = 5979
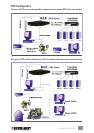
EXAMPLE: Router Internet IP virtual server (port range open) switch’s local IP
61.232.134.120 virtual server (port 5970–5979 open) 192.168.1.7
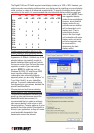
Once you’ve congured a virtual server with an appropriate port range open (<port_base> –
<port_base_+_9>), you can try to access your switch across the Internet by using a public IP
address and designated port number. Based on the previous example settings:
• Browser access: https:// 61.232.134.120:5978
• Viewer access: 61.232.134.120:5970
If you have domain name mapping to the public IP address, you can also use the domain
name; for example:
• Browser access: https:// www.mycompany.com:5978
• Viewer access: www.mycompany.com:5970
NOTE: Once you’ve changed the port base of your switch, you should also modify the open
port range on your router accordingly if you want Internet access to come across.
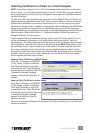
Installation of Certicates
NOTE: You can use the default set of certicates (on the included CD) to practice making some
PKI-authenticated connections as long as your network safety isn’t jeopardized. It’s recommended
that this be done within your local area network, assuming it’s well secured with an adequate
rewall and other due precautions against network intrusions. Otherwise, anyone who has a
copy of the default certicates can establish a connection to your servers. If you have already
obtained a set of certicates with the le names and formats required for the switch (which is
strongly recommended), you can use them for viewer authentication. You can also generate
the certicates using software like XCA. (For certicate generation using XCA, refer to “How
to Generate KLE Certicates Using XCA” on the included CD.)
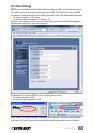
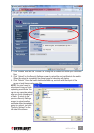
First, you need to have these certicates — as mentioned above, if you haven’t obtained your
own certicates, you can use the default set of certicates — ready on your client computers
for uploading to the switch via a Web browser:
• root certicate (root.crt)
• server certicate (server.crt), and
• server private key (serverkey.pem)
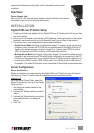
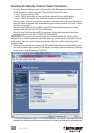
Once you’ve located whichever set of certicates is to be used, you can begin the installation
process.
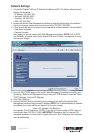
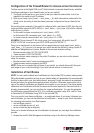
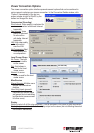
1. Access the switch’s Web Management interface and go to the Security Settings screen.
‡
‡
‡
‡
‡
‡
‡
‡
14
INSTALLATION