


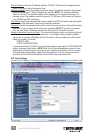


address from which the login attempt originated, even when the attempt was not successful.
Also, it will show certain technical details, such as the compression ratio, encoding scheme
and bytes transmitted in each successful viewer session. This is the screen you should view
rst if you want to know the usage/“health” conditions of your switch.
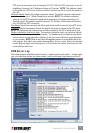
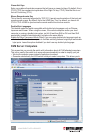
Enable Log: Select to enable the logging of switch server events. If you choose to not enable
this option, no logging will be done.
Print Statistics: If you need to know more about the switch’s server statistics — such as the
compression ratio, bytes transmitted, rectangles drawn, frame buffer updates and key events
received — select this option so that you can have quantied data for the prole of each
session. To record the statistics of the video server and port switching activity by the switch’s
remote users, select this option to print statistics to the server log le.
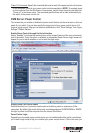
Each log entry is preceded by a date code, time stamp and description of the specic log event.
Look here for the IP address that is assumed by login users when they made the login attempt,
and for the statistics of each session as a useful reference for the quantied data of each
viewer connection. Note that the log le is of a denite size: Older log entries will be erased
when the log le has reached its maximum size while newer logging events keep coming in.
Click “Refresh” to update the screen output of the log le. Since newer server log events may
have occurred and been logged to the database after your previous access of this server log
page, click “Refresh” to reload the log messages. Click “Clear” to erase the log le contents
in the database. NOTE: The server log is erased each time you perform a complete reboot
remotely by hitting “Reboot” on the Maintenance/Reboot screen or when the switch suffers a
power loss.
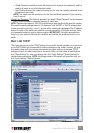
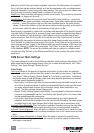
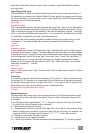
KVM Server: Main Settings
This screen allows you to set up the KVM server operation: video quality and optimization, KVM
switch model and the auto scanning function. After you’ve made all modications, click “Store
Settings,” then “Apply Settings”/“Restart Servers.”
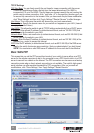
Video Quality
Filter Level: Based on the desired (or required) combination of video quality and available
bandwidth, select one of three video lter levels for the switch’s video server: “High Quality,
Low Speed,” “Medium Quality, Medium Speed” or “Low Quality, High Speed.” Understand
that there’s always a trade-off between video quality and response speed when constrained
by limited network bandwidth availability.
• High Quality, Low Speed (light lter) is recommended for high bandwidth networks such
as a LAN or broadband Internet. It requires more bandwidth than the other two lter levels
and video refresh speed is slower (only noticeable, though, when bandwidth is very
limited). This lter provides the best image quality.
• Medium Quality, Medium Speed (medium lter) is recommended for Internet connections.
It requires more bandwidth than the “Low Quality, High Speed” option, but is most often
the best speed/bandwidth compromise.
• Low Quality, High Speed (strong lter) is recommended for very limited bandwidth
conditions, such as a dial-up modem line to the Internet. With this setting, the viewer screen
is updated only on big video changes. Most of time there will be no transmission at all.
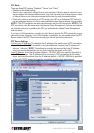
Automatic Filter Adjustment: When this option is selected, the switch can tune the video lter
automatically for optimized performance according to the current bandwidth availability.
Automatic Screen Alignment: When this option is selected, the switch tries to center the view
screen automatically to eliminate the offsets sometimes seen on the viewer screen as black
gaps.
Automatic Image Optimization for Speed: When this option is selected, the switch tries to
optimize the video settings (phase, light and contrast) to produce images of better quality
with higher compression.
38
MANAGEMENT OVER A BROWSER