


A-61070 September 1999 3-7
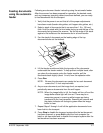
Feeding documents
using the automatic
feeder
Following are document feeder instructing using the automatic feeder.
After the scanner has been prepared for operation, the desired mode
and any temporary operating values have been defined, you are ready
to feed documents into the transport.
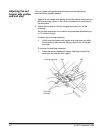
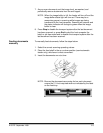
1. Verify that the power is on and that all of the proper adjustments
have been made (feeder side guides, exit hopper side guides, etc.).
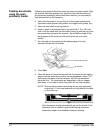
2. Select a stack of documents that is no more than 1.5 in. (38 mm)
thick. Hold the stack with the front sides facing up and the top of the
documents facing toward the scanner. Tap the top edge of the stack
against a flat surface so the documents are in an even bundle.
3. Fan the stack of documents so the leading edge of the top
document sticks out the farthest.
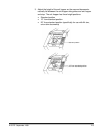
4. Lift the feeder module and slide the top edge of the documents
underneath the feeder module. To help prevent multiple feeds, after
you place the documents under the feeder module, pull the
documents back slightly (about ¼-inch) from the separator roller.
5. Press Run.
NOTE: Be sure the documents are center-fed so each document
covers the 3 ½-inch required width.
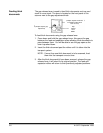
6. As you scan documents, set the image level, as required, and
periodically remove documents from the exit hopper.
NOTE: When the image buffer is full, the feeder will turn off and the
image buffer status light will turn red. There may be a
momentary pause in scanning while images are being
transferred to the host computer. Scanning will resume and
the status indicator will change to green when the image
buffer is clear.
7. Repeat Steps 2 through 4 until all the application documents have
been fed into the transport.
8. Press Stop to disable the transport system after the last document
has been scanned, or press End to alert the host computer the
batch or job has ended and to disable the transport system after the
last document has been scanned.