


A-61070 September 1999 5-3
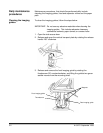
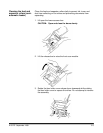
4. Release and remove the rear imaging guide by swinging the guide
toward the front of the scanner (to release it from the two magnets),
and lifting it from the scanner’s two mounting pins.
5. Clean the surfaces of both the front and rear imaging guides with an
antistatic wiper or a clean, soft, lint-free cloth, slightly moistened
with water or lens cleaner.
6. Dry the imaging guides with a dry, lint-free cloth.
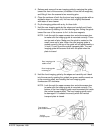
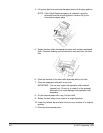
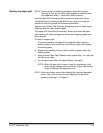
7. Hold the rear imaging guide by the edges and carefully set it back
into the scanner by seating it on the mounting pins. Swing the guide
toward the rear of the scanner to fix it to the two magnets.
NOTE: Look through the upper access door and side access door
to make sure the imaging guide is mounted correctly. There
are two sets of pins. Make sure the guide is seated on the
small, lower set of pins. When the rear imaging guide is
seated correctly, the top of the guide will sit approximately a
½-inch (10 mm) from the vertical transport plate. The rear
imaging guide will become flush with the plate when the
plate is closed.
Rear imaging guide
saddle mount
Rear imaging guide
mountin
g
pin
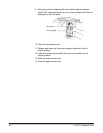
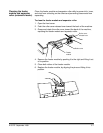
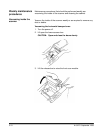
8. Hold the front imaging guide by the edges and carefully set it back
into the scanner by seating the guide’s two green saddle mounts on
to the mounting shaft, and rotating the front imaging guide
thumbscrew 90° clockwise.
NOTE: Look through the upper access door and side access door
to make sure the imaging guide is mounted correctly. The
bottom of the front imaging guide must be seated just inside
the vertical transport plate. The front imaging guide could
be damaged if it is seated incorrectly when the vertical
transport plate is closed.
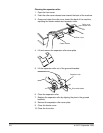
Front imaging
guide saddle mount
Vertical
transport plate