


22
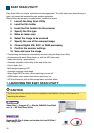
EASY SCAN UTILITY
Easy Scan Utility is a simple, automatic scanning application.The utility works as a stand-alone pro-
gram, and cannot be launched through another application.
Simply follow the ten steps to create perfect, trouble-free scans:
1. Launch the Easy Scan Utility
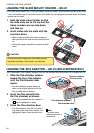
2. Load the film holder
3. Insert the film holder into the scanner
4. Specify the film type
5. Make an index scan
6. Select the image to be scanned
7. Specify the use of the scanned image
8. Choose Digital ICE, ROC, or GEM processing
9. Confirm the scanner settings
10. Scan and save the image
• The following functions are automatically set when using the Easy Scan Utility:
- Autofocusing with each 35mm frame, or with first APS frame only.
- Index scan priority : speed setting
- Automatic shutdown of the utility at the end of the scan
- Colour depth: 8 bit
- Multi-sample scanning: OFF
- Automatic cropping: inside edge.
- When Digital ROC is active, colour matching is turned off.
- sRGB output colour space when colour matching is on.
- AE (Auto Exposure) with all films except black and white slides.
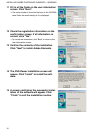
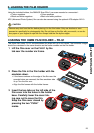
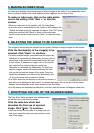
1. LAUNCHING THE EASY SCAN UTILITY
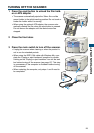
CAUTION
The front door of the scanner must be completely closed before turning on the scanner or
launching the software.
Select Start -> Program (P) -> Minolta DiMAGE Scan Elite2
ver.1.0 -> DS Elite2 Easy Utility.
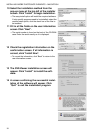
Open the DS Elite 2 folder, and double click the DS Elite 2
Easy Utility icon.