


Customizing fax settings
Changing the fax resolution
Adjusting the resolution setting changes the quality of the fax. Settings range from Standard (fastest speed) to Super
Fine (slowest speed, highest resolution).
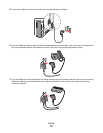
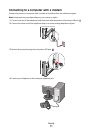
1 Load an original document faceup, short edge first into the ADF or facedown on the scanner glass.
Note: Do not load postcards, photos, small items, transparencies, photo paper, or thin media (such as magazine
clippings) into the ADF. Place these items on the scanner glass.
2 If you are loading a document into the ADF, then adjust the paper guides.
3 From the printer control panel, press the Fax button.
4 Enter the fax number using the keypad.
5 Press the Options button.
6 Press the arrow buttons until Resolution appears, and then press .
7 Press the arrow buttons to change the resolution, and then press .
8 Press .
Making a fax lighter or darker
1 Load an original document faceup, short edge first into the ADF or facedown on the scanner glass.
Note: Do not load postcards, photos, small items, transparencies, photo paper, or thin media (such as magazine
clippings) into the ADF. Place these items on the scanner glass.
2 If you are loading a document into the ADF, then adjust the paper guides.
3 From the printer control panel, press the Fax button.
4 Enter the fax number using the keypad.
5 Press the Options button.
6 Press the arrow buttons until Darkness appears, and then press .
7 Press the arrow buttons to make the fax lighter or darker, and then press .
8 Press .
Blocking junk faxes
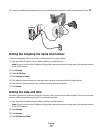
1 Type the printer IP address into the address field of your Web browser.
Note: If you do not know the IP address of the printer, then print a network setup page and locate the IP address
in the TCP/IP section.
2 Click Settings.
3 Click Fax Settings.
4 Click Analog Fax Setup.
Faxing
77