Viewing computer images (continued)
Setting the screen size
Change the setting of the SCREEN according to the type of the screen to be used.
(See page 31 for menu setting.)
1. Display the INSTALLATION 2 menu.
2. Select SCREEN by pressing the or button.
3. Select your desired aspect ratio by pressing the or button.
• Youcanselecttheaspectratiofrom16:10,16:9,and4:3.
To cancel the menu:
4. Press the MENU button.
Setting the aspect ratio
You can change the aspect ratio of the input video signal (or the ratio of width to height of the image). Change the
setting according to the type of the screen to be used or your preference.
How to change the settings:
With the remote control:
1. Press the ASPECT button.
• EverytimetheASPECTbuttonispressed,theaspectmodechangesfromNORMALto16:9,toNATIVE,to
FULL, to USER and back to NORMAL.
• When16:9isselectedbySCREEN,16:9cannotbeselected.
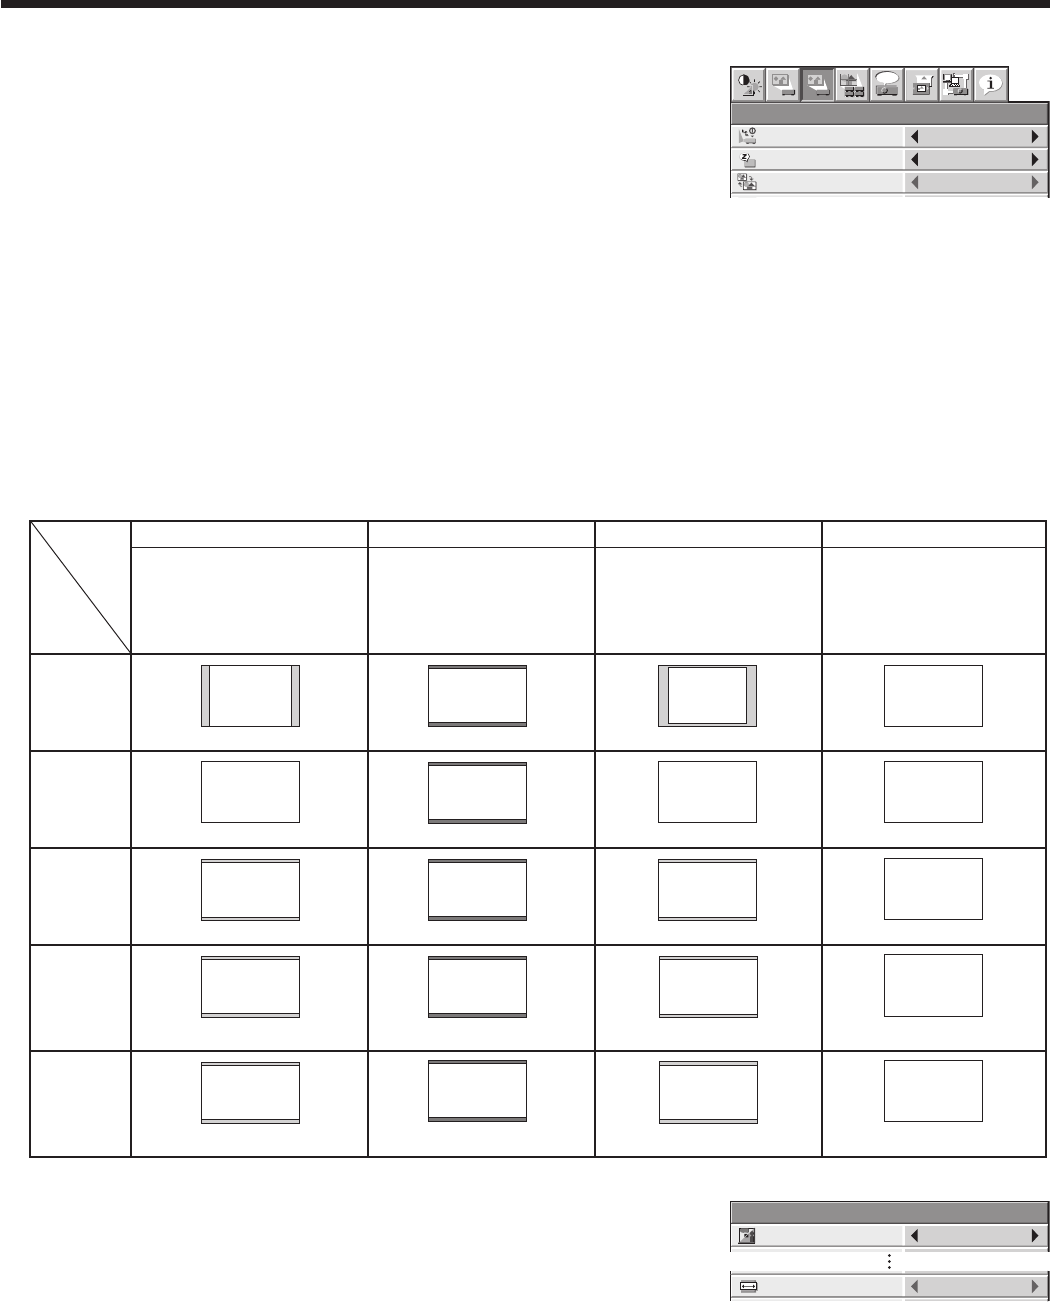
• Thefollowingtableshowstheimagedisplaypatternsdependingonthesettings.
When SCREEN is 16:10:
4:3 signal,
XGA signal
(1024 x 768),
etc.
WXGA signal
1280 x 800
(16:10)
WXGA signal
1280 x 768
(16:9.6)
WXGA signal
1360 x 768
(16:9.04)
16:9 signal
and
WXGA signal
1366 x 768
16:10
NORMAL
Input signal
Setting 16:9
NATIVE FULL
Input video signal is displayed at
the max height (800 pixels) or max
width (1280 pixels) of the panel
while its aspect ratio is maintained.
Regardless of the type of input
signal, image is displayed at 16:9
aspect ratio (1280 x 720 pixels).
Select to expand squeezed (or
horizontally compressed) images
such as DVD images to 16:9.
Input video signal is displayed at
its original pixel size. (When the
pixel size is larger than the panel
size, only the center part of the
image is displayed.)
Regardless of the type of input
signal, image is displayed at the
full panel size (1280 x 800 pixels).
4:3
1066 x 800
16:9.6
1280 x 768
16:9.04
1280 x 720
16:9
1280 x 720
16:10
16:9
1280 x 720
16:9
1280 x 720
16:9
16:9
1280 x 720
16:9
1280 x 720
16:9.6
1280 x 768
1280 x 768
(1360 x 768)
1280 x 768
(1366 x 768)
16:10
16:10
1280 x 800
16:10
1280 x 800
16:10
1280 x 800
16:10
1280 x 800
1024 x 768
4:3
1280 x 800 1280 x 720 1280 x 800 1280 x 800
(Part of image)
16:9.6
(Part of image)
16:9.6
With the SIGNAL menu:
(See page 31 for menu setting.)
1. Display the SIGNAL menu.
2. Select ASPECT by pressing the or button.
3. Select your desired aspect ratio by pressing the or button.
To cancel the menu:
4. Press the MENU button.
Important:
• Insuchcasesaswhenyoukeepprojectingimagesinthenarrowerareathanthescreenforalongtimeandthen
change the mode to FULL, the masking areas may remain as afterimage around the displayed image. Consult
your dealer in this case.
• Ifyouchangethescreensetting,theaspectsettingisautomaticallychangedtoNORMAL.Therefore,insucha
case, set the desired aspect ratio again.
A
U
SIGNAL
MEMORY CALL
AUTO
ASPECT
NORMAL
REMOTE 1 MODE
FILTER MENU
INSTALLATION 2
AUTO POWER ON
AUTO POWER OFF
OFF
ON
BLUE
AUTO
5min
IMAGE CAPTURE
SPLASH SCREEN
DVI LONG CABLE
BACK COLOR
1
1
2
2
opt.
ON
ENTER
ENTER
SETUP
SCREEN
16:10


