


MTASR1-100 Owner’s Manual
14
1.4 Typical Applications
Two typical applications are described; the first application describes a RouteFinder
100
connected to an IP
LAN using two modems or DSU for the WAN communications, the second application describes a
RouteFinder
100
connected to an IP LAN and frame relay being used for the WAN communications. Using
frame relay changes the RouteFinder
100
into a single port router with many virtual WAN ports. When frame
relay is configured on the RouteFinder
100
, only one physical WAN port is used. This WAN port can have up to
16 virtual WANs running off from it.
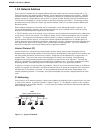
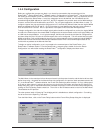
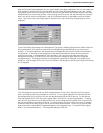
1.4.1 Typical IP Application
A typical application for the RouteFinder
100
is connecting two local area networks (LANs) together using either
a modem or DSU for the wide area network (WAN) communications. In this typical application the LAN
protocol is IP. As shown in Figure 1-4, LAN 1 is assigned a network address of 200.2.10.x and LAN 2 is
assigned a network address of 200.3.12.x. The Ethernet port of the RouteFinder
100
for LAN 1 has an address
of 200.2.10.1 and the WAN 1 address is 200.2.11.1. The LAN 2 network address is 200.3.12.x with the
RouteFinder
100
Ethernet port address of 200.3.12.1 and a WAN 1 address of 200.2.11.2.
Figure 1-4. Typical Application
To connect the RouteFinder
100
to LAN 1, the Ethernet port needs to be connected to LAN 1 using either a
twisted pair RJ-45 telephone cable or a 10Base5 (thicknet) cable connected to the Ethernet Attachment Unit
Interface (AUI) connector on the back panel of the RouteFinder
100
.
To connect the RouteFinder
100
to a WAN device, the type of WAN device has to be considered; is it a modem
device or a DSU device and is the device synchronous or asynchronous. Also, is the communicaitons link
going to be a dial-up, lease line or DDS.
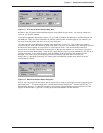
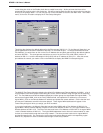
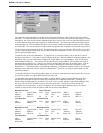
To configure the RouteFinder
100
, a PC needs to be running Windows®. With Windows running on the PC,
insert the RouteFinder
100
Software diskette into the disk drive and at the run command dialog box, start the
loading of the RouteFinder
100
software. Follow the normal software loading process and when the dialog box
for the IP Protocol Default Setup is displayed, click on the OK button to continue loading. The RouteFinder
100
IP Protocol Default Setup dialog box is shown in Figure 1-5.