


Chapter 1 - Introduction and Description
15
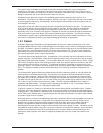
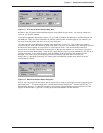
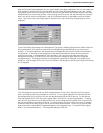
Figure 1-5. IP Protocol Default Setup Dialog Box
All fields in the IP Protocol Default Setup dialog box have default values in them. You need to change the
values to your specific network.
In the typical application presented in Figure 1-5, you need to establish the address for the Ethernet port and
the WAN port. When you have entered the IP address, subnet mask, and frame type for your network, you
can click on the OK button and move on to the next dialog box.
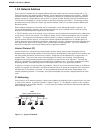
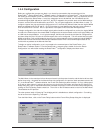
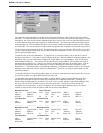
The next dialog box is the WAN Ports Default Setup dialog box (Figure 1-6). This is where you need to
consider how your wide area network is going to be used. First of all, is it a modem, DSU, ISDN type of device
and does the device operate in synchronous or asynchronous mode. If the communications device is
synchronous, all the other fields within the dialog box for that port are disabled (i.e., they turn to a gray print
and you can not select those fields). If the device is asynchronous, then you have to decide if it is a dial-up or
a direct connection. If it is a dial-up device, then the Modem Type field and the Dial Number field are
activated. You need to pick your modem type frome the Modem Type drop down list and if your
RouteFinder
100
is providing the dialing, you need to enter the telephone number at the other end of the
communication network.
Figure 1-6. WAN Ports Default Setup Dialog Box
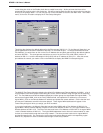
So now, you can click on the OK button and the setup utility is ready to download your new configuration into
the RouteFinder
100
. The new configuration is downloaded into the RouteFinder
100
and the RouteFinder
100
is
automatically rebooted. The Windows software returns to the Program Manager screen and when the FAIL
light on the RouteFinder
100
goes off, it is ready to transfer data between the two networks.