9
Quick Start
Installation
For Assistance, Call 1-800-435-7329
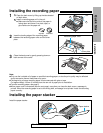
Tab
A
B
Recording paper roller
Silver plate
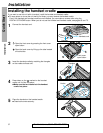
Close the back cover by gently pressing down on
both corners of the cover.
2
Insert the leading edge of the recording paper
between the recording paper roller and the silver
plate.
1
Open the back cover by lifting up the tabs located
on both sides.
Install a recording paper roll in the unit.
● Make sure that the shiny side of the paper is
facing down and there is no slack, tape, or
glue residue on the paper roll.
B
A
Note:
●
Only use the included roll of paper or specified recording paper, or else the print quality may be affected
and/or excessive thermal head wear may occur.
●
The beginning of some recording paper rolls are secured with glue or tape.
Cut approximately 150mm (6 inches) from the new roll of paper prior to installation.
●
To order recording paper, see page 6.
●
When power cord is connected (see the next page), everytime you close the back cover a message is
printed. When the recording paper is set to the wrong side, a message is not printed. Install the recording
paper correctly.
correct incorrect
3
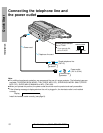
Paper stacker
Install the paper stacker.
Installing the recording paper
Installing the paper stacker


