


3. Telephone
25
3 TelephoneAutomatic Dialing
3.1 Storing names and telephone
numbers into the phonebook
The phonebook allows you to make calls without having
to dial manually. You can store 100 names and
telephone numbers to the phonebook.
L You can also send faxes using the phonebook (page
32).
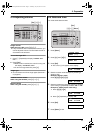
1 Press {Menu} repeatedly to display “PHONEBOOK
SET”.
2 Press {>}.
L The display shows the number of available items
in the phonebook briefly.
3 Enter the name, up to 16 characters (see page 22 for
instructions).
4 Press {Set}.
5 Enter the telephone number, up to 24 digits.
6 Press {Set}.
L To program other items, repeat steps 3 to 6.
7 Press {Menu} to exit.
Note:
L You can confirm the stored items by printing the
telephone number list (page 64).
To correct a mistake
1. Press {<} or {>} to move the cursor to the incorrect
character/number.
2. Press {Stop}.
L To erase all characters/numbers, press and hold
{Stop}.
3. Enter the correct character/number.
3.2 Making a phone call using the
phonebook
Before using this feature, store the desired names and
telephone numbers in the phonebook (page 25).
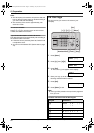
1 Press {>}.
L Confirm that there are no documents in the
document entrance.
2 Press {A} or {B} repeatedly to display the desired
item.
3 Lift the handset or press {Monitor}.
L The unit will start dialing automatically.
To search for a name by initial
Example: “LISA”
1. Press {>}.
L Confirm that there are no documents in the
document entrance.
2. Press {A} or {B} to enter the phonebook.
3. Press {5} repeatedly to display any name with the
initial “L” (see the character table, page 22).
L To search for symbols, press {1}.
4. Press {B} repeatedly to display “LISA”.
L To stop the search, press {Stop}.
L To dial the displayed party, lift the handset or
press {Monitor}.
3.3 Editing a stored item
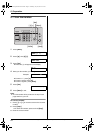
1 Press {>}.
L Confirm that there are no documents in the
document entrance.
2 Press {A} or {B} repeatedly to display the desired
item.
3 Press {Menu}.
4 Press {*}.
L If you do not need to edit the name, skip to step
6.
5 Edit the name. For further details, see the storing
procedure on page 25.
6 Press {Set}.
L If you do not need to edit the telephone number,
skip to step 8.
7 Edit the telephone number. For further details, see
the storing procedure on page 25.
8 Press {Set}.
L To edit other items, repeat steps 2 to 8.
9 Press {Stop} to exit.
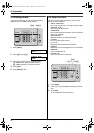
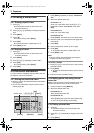
{<}{>}
{Stop}
{Menu}
{Set}
FL421-PNQX3022ZA-OI-en.book Page 25 Thursday, July 29, 2010 9:35 AM