


6. Fax
56
6.13 Receiving a fax on your
computer
You can receive a fax document on your computer. The
received fax document is saved as an image file (TIFF-
G4 format).
Important:
L Make sure the PC fax setting is set to “Always”
or “Connected” beforehand (feature #442 on
page 70).
L Make sure the computer setting for the PC fax
reception is set beforehand (feature #443 on
page 26).
L Make sure the fax preview mode is turned OFF
beforehand (feature #448 on page 56).
1 Press {Fax Auto Answer} repeatedly to turn the
auto answer setting ON (page 50).
2 Start Multi-Function Station. i [PC FAX]
3 When a fax call is received, your computer will
receive a document through the unit.
Note:
L You can view, print or transfer the received document
using your computer.
Viewing a received document
1. Select [PC FAX] from Multi-Function Station.
2. Select [Received Log] in [Communication Log].
3. Click the item you want to view.
4. Click [File] in the menu bar, then select [View], or
click the [View] icon in the toolbar.
L The received fax will be displayed.
If a received fax document is stored in the unit’s
memory
You can load the document into your computer.
1. Select [PC FAX] from Multi-Function Station.
2. Select [Received Log] in [Communication Log].
3. Click [File] in the menu bar. i [Receive a Fax]
L If the PC fax setting (feature #442 on page 70) is
activated, the received fax document will be
automatically transferred to the computer.
6.14 Web fax preview (LAN
connection only)
You can display a received fax document in your web
browser, and print or save the necessary document after
you confirm the image.
Important:
L Web fax preview will not be activated when using
the unit for the first time. To activate this feature,
set the following:
– “6.14.1 Activating the fax preview mode”,
page 56.
– “6.14.2 Programming the web fax preview
access code”, page 56.
6.14.1 Activating the fax preview mode
1
{Menu} i {#}{4}{4}{8}
2 Press {1} to select “On”.
L Press {0} to select “Off”.
3 {Set} i {Menu}
Note:
L If you select “On”, the PC fax setting (feature #442
on page 70) will be deactivated.
6.14.2 Programming the web fax preview
access code
1
{Menu} i{#}{4}{5}{0} i {Set}
2 Enter the password (feature #155 on page 64). i
{Set}
3 Enter the web fax preview access code, up to 8
characters, using the English alphabet and numbers
(see page 83 for character entry).
L The following symbols can also be entered.
!@#$%^&’)(.–_{}
4 {Set} i {Menu}
Note:
L If the web fax preview access code is not
programmed (blank), the web fax preview feature will
not be activated.
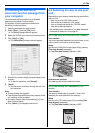
6.14.3 Displaying a received fax document
on the web browser
Important:
L Make sure that the unit is idle.
1 Start Multi-Function Station.
2 [Utilities] i [Configuration Web Page] i
[Advance Configuration]
3 Type “root” as the user name, then enter the
password (feature #155 on page 64). i [OK]
4 Select the [Web Fax Preview] tab.