


9. Programmable Features
80
IP filtering for the LAN
connection
{#}{5}{3}{2}
{0} “Disabled” (default): Deactivates this feature.
{1} “Enabled”: The unit will deny/approve access from the pre-programmed
IP patterns. You can program whether to deny or approve IP addresses. Up to
4 patterns each for IPv4 and IPv6 can be programmed through the web browser
interface.
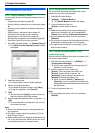
1. Start Multi-Function Station.
2. [Utilities] i [Configuration Web Page] i [Network Configuration]
3. Type “root” as the user name, then enter the password (feature #155 on
page 64). i [OK]
4. Select the [LAN Feature] tab.
5. Click [Edit] next to [IP Filtering].
6. Click [Edit] next to [Filter (IPv4)]/[Filter (IPv6)].
7. Change the mode and edit IP filtering information. i [Submit]
8. Close the web browser.
Setting the IP address
automatically for the LAN
connection
{#}{5}{3}{3}
This feature will be displayed only when feature #500 is activated.
{0} “Disabled” (default): Deactivates this feature.
{1} “Enabled”: IP address will be allocated automatically without using a
DHCP (Dynamic Host Configuration Protocol) server.
Setting HTTPD for the LAN
connection
{#}{5}{3}{4}
{0} “Disabled”: Denies access to the web browser.
{1} “Enabled” (default): Allows access to the web browser.
IPv6 protocol
{#}{5}{3}{5}
{0} “Disabled” (default): Deactivates this feature.
{1} “Enabled”: IPv6 protocol can be used. After installing the printer driver, be
sure to change the port to IPv6 protocol. You can check the IPv6 protocol
address by printing the “Setup List” (page 109).
Note:
L To activate this feature, you need to turn the power switch of the unit OFF,
then ON.
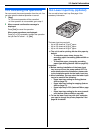
Setting the paper input tray to
use for the scan to email print
feature
{#}{5}{6}{5}
This feature will be displayed only when the lower input tray is installed (page
85).
{1} “#1” (default): Standard input tray
{2} “#2”: Lower input tray
{3} “#1+#2”
Note:
L To select “#2”, select “Plain Paper” or “Thin Paper” for the recording
paper type setting (feature #383 on page 65).
L To select “#1+#2”,
– select the same paper size for the standard input tray (feature #380 on
page 65) and lower input tray (feature #382 on page 65). If either is
changed, “#1” will be selected automatically.
–select “Plain Paper” or “Thin Paper” for the recording paper type
setting (feature #383 on page 65).
Erasing all email addresses
stored in the unit
{#}{5}{7}{8}
{0} “No” (default)
{1} “Yes”
L Disconnect the telephone line cord, USB cable and LAN cable before
activating this feature.
To erase all email addresses:
1. {Menu} i {#}{5}{7}{8}
2. Press {1} to select “Yes”. i {Set}
3. Press {1} to select “Yes”. i {Set} i {Menu}
Feature/Code Selection