Chapter 4 Settings — [ADVANCED MENU] menu
88 - ENGLISH
15) Press as to select [UPPER], [LOWER], [LEFT], or [RIGHT] in [BLACK BORDER WIDTH].
16) Press qw to set the region (width) of the [BLACK BORDER WIDTH] adjustment.
f When PT-DZ13KU, PT-DS12KU, or PT-DZ10KU is used, proceed to Step 17).
f When PT-DW11KU is used, proceed to Step 19).
17) Press as to select [UPPER KEYSTONE AREA], [LOWER KEYSTONE AREA], [LEFT KEYSTONE
AREA], or [RIGHT KEYSTONE AREA].
18) Press qw to adjust the tilt of the border between [NON-OVERLAPPED BLACK LEVEL] and [BLACK
BORDER LEVEL].
19) Press as to select [BLACK BORDER LEVEL].
20) Press the <ENTER> button.
f The [BLACK BORDER LEVEL] screen is displayed.
f If [INTERLOCKED] is set to [OFF], [RED], [GREEN], and [BLUE] can be adjusted individually.
21) Press as to select an item, and press qw to adjust the setting.
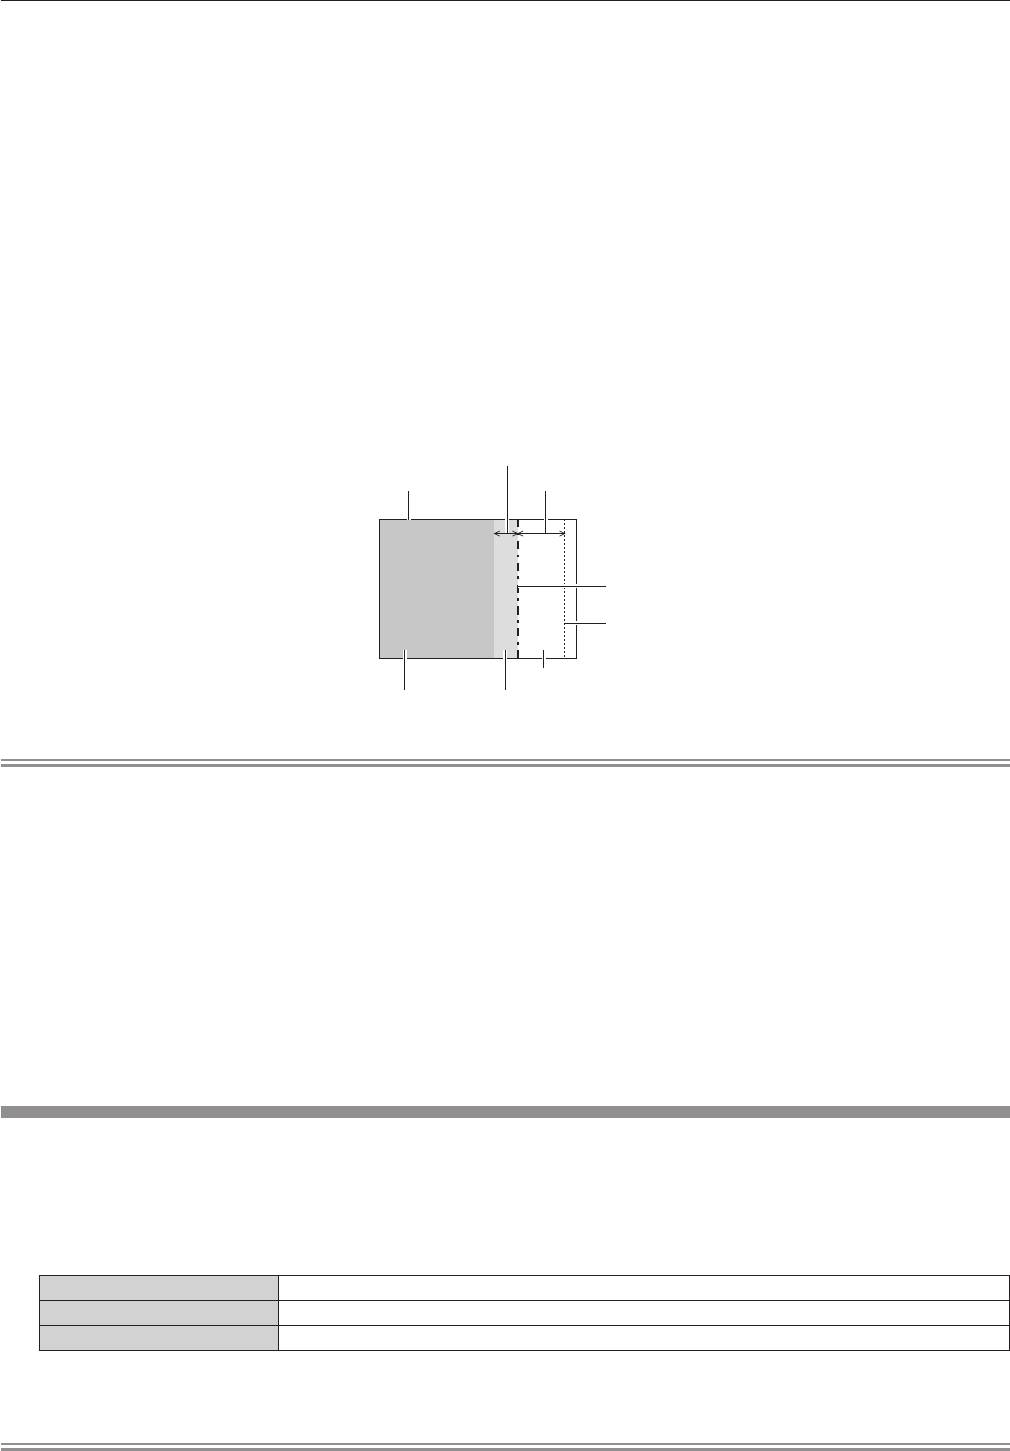
[BLACK BORDER WIDTH] (Right)
Projection range Edge blending [WIDTH] (Right)
[MARKER] (Red)
Edge blending [START] (Right)
([MARKER] (Green))
[BLACK BORDER LEVEL]
[OVERLAPPED BLACK LEVEL] (Right)
[NON-OVERLAPPED BLACK LEVEL]
Note
f [BRIGHTNESS ADJUST] is a function that makes the increased brightness in black level of the overlapping image area difcult to notice
when [EDGE BLENDING] is used to congure multiple screens. The optimal point of correction is set by adjusting [NON-OVERLAPPED
BLACK LEVEL] so the black level of the overlapping image area will be the same level as the non-overlapping area. If the border area of the
part where the image is overlapping and the non-overlapping part gets brighter after adjusting [NON-OVERLAPPED BLACK LEVEL], adjust
the width of the top, bottom, left, or right. Adjust [BLACK BORDER LEVEL] when the width adjustment makes only the border area darker.
f The joining part may look discontinuous depending on the position you are looking from when a screen with high gain or rear screen is used.
f When conguring multiple screens using both horizontal and vertical edge blending, adjust [OVERLAPPED BLACK LEVEL] rst before
making adjustments in Step 12). Adjustment method is same as the procedure of [NON-OVERLAPPED BLACK LEVEL].
f If only horizontal or vertical edge blending is used, set all items in [OVERLAPPED BLACK LEVEL] to 0.
f [AUTO TESTPATTERN] settings change together with the [AUTO TESTPATTERN] of [COLOR MATCHING].
f Adjustment of the tilt of the border between [NON-OVERLAPPED BLACK LEVEL] and [BLACK BORDER LEVEL] is a function to perform
the adjustment of [GEOMETRY] (x page 81) together with the edge blending. If [NON-OVERLAPPED BLACK LEVEL] is tilted by
correcting the keystone from [KEYSTONE] in [GEOMETRY], perform Steps 17) and 18) to adjust the edge blending according to the shape
of [NON-OVERLAPPED BLACK LEVEL].
f When the keystone is corrected with [KEYSTONE], the edge blending cannot be adjusted together. (Only for PT-DW11KU)
[FRAME RESPONSE]
Set image frame delay.
1) Press as to select [FRAME RESPONSE].
2) Press qw to switch the item.
f The items will switch each time you press the button.
[NORMAL] Standard setting.
[FAST]
*1
Simplies the image processing to reduce image frame delay.
[FIXED]
*2
Sets image frame delay to be constant regardless of the image position or magnication.
*1 When input signals are other than interlaced signals, [FAST] cannot be set.
*2 Only when movie-based signals and still image signals with the vertical scanning frequency of 50 Hz or 60 Hz are input
Note
f When [FRAME RESPONSE] is set to [FAST], picture quality deteriorates. Also, [DIGITAL CINEMA REALITY] cannot be set.
f [FRAME RESPONSE] cannot be set during P IN P.


