


Protecting Documents Stored in the Document Server
41
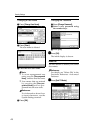
Managing Saved Documents
By using the machine as a network printer with TCP/IP protocol, you can check or delete
documents saved in Document Server from a Ridoc Desk 2000 / Lt networked computer.
You can control printing from the computer as well as from the control panel.
Note
❒
For details about operating Ridoc Desk 2000 / Lt, see Help for Ridoc Desk 2000 / Lt.
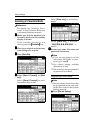
Printing Saved Documents
Document Server allows you to print documents sent from a computer. Register a file
name, user name or user ID (according to operating system or printer driver) as follows.
Important
❒ Do not attempt to interrupt data being sent to the Document Server. If you ac-
cidentally interrupt sending, delete the sent document using the control panel
of the machine. For details about deleting, see Copy Reference.
❒
No more than 200 documents can be stored in the server. Even if fewer than 200
documents are saved, when a document of more than 1,000 pages is saved or
memory is full, no more can be stored. Stored documents include the following:
• Documents scanned from document feeder or exposure glass saved in
Document Server
❒ Delete unnecessary documents whenever possible. For details about deleting,
see Copy Reference.
Note
❒
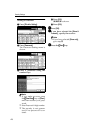
If you enter an incorrect password for a document three times consecutively, docu-
ment access is refused. Turn off the main power switch, and then turn it on to re-enter
correctly. However, access attempts for other documents are still accepted.
❒ Enter Password using 4-digit number.
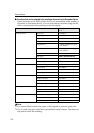
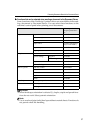
Operating system Description
Windows RPCS (standard) Click the
[
Setup
]
tab (when
[
Multi-tab
]
is selected) or the
[
Print Settings
]
tab (when
[
Cus-
tom Setting
]
is selected), and
then click
[
Details…
]
to display
the
[
Job Type Details
]
dialog
box. In the
[
Job Type Details
]
di-
alog box, enter a file name and
user name.
PostScript 3 (optional) Click the
[
Store/History
]
tab,
and then enter a user ID.
Macintosh Click the
[
Store/History
]
menu,
and then enter a user ID.