


38
Chapter 4. Changing the Sampling Settings
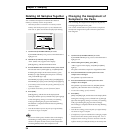
Setting the Sample Volume
With the SP-303, you can set the volume level for each
sample individually.
This is convenient for balancing the volume levels of samples
on different pads.
fig.r04-07
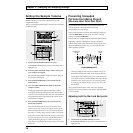
1. Confirm that [PATTERN SELECT] is not lit.
If [PATTERN SELECT] is lit, press it so that the button’s
light goes out.
2. Press the pad to which the sample whose volume you
want to adjust is assigned.
The pad will light, and the sample will sound. This pad
becomes the current pad.
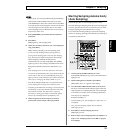
3. Press [START/END/LEVEL], and confirm that the
button has lit.
4. Turn the CTRL 3/MFX (LEVEL) knob to adjust the
sample’s volume.
Turning the knob to the right increases the volume;
turning the knob to the left decreases the volume. The
volume is set to maximum when the value 127 is selected
using the knob. This is equivalent to the volume of the
sound directly sampled.
5. Press [START/END/LEVEL], and confirm that the
button has turned off.
* When [START/END/LEVEL] is lit, you can then use the
CTRL 1 and 2 knobs to change not only the volume, but the
Start Point and End Point as well. If you inadvertently move
the CTRL 1 or CTRL 2 knob, return the CTRL 1 and 2 knobs
to the center position. This restores the settings in effect before
the knobs were moved. If you press [START/END/LEVEL],
causing the button light to go out, without returning the
knobs to the center position, the changed settings are recorded
and stored.
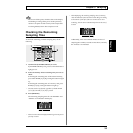
Preventing Unneeded
Portions from Being Played
(Markers/Start Point/End Point)
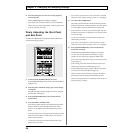
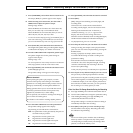
On the SP-303, the area of the waveform data which will
actually playback can be specified/memorized
independently for each sample.
The point at which the waveform data will begin playing is
called the Start Point, and the point at which it will stop
playing is called the End Point.
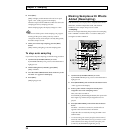
If the sound you sampled contains unwanted material at the
beginning, adjust the Start Point so that the unwanted
portion is not heard. If the unwanted material is at the end,
adjust the End Point. In this way, you can make only the
desired portion playback.
fig.r04-08
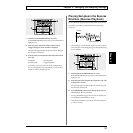
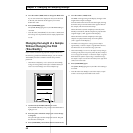
* When you modify the Start Point or End Point settings, the
BPM will be calculated according to the newly specified time,
and displayed. If the sampling time is two or more measures or
is less than one measure, the BPM display value may be double
or half the correct value. In this case, carry out the procedure
in “Changing the Sample's BPM” (p. 41) to reset this to the
desired value.
Also, please be aware that in some cases (such as triple
meter), it may not be possible to calculate or adjust the BPM
value accurately.
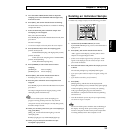
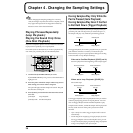
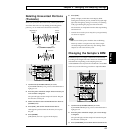
Adjusting both the Start and End points
fig.r04-09
1. Confirm that [PATTERN SELECT] is not lit.
If [PATTERN SELECT] is lit, press it so that the button’s
light goes out.
4
3,5
2
1
unwanted
Beginning of
sample
Start point End point
unwanted
End of
sample
the portion which is played back
1
3,4
2