


46
Chapter 5. Recording Sample Performances (Pattern Sequencer)
Erasing the Data for Mistakes in
Performances
You can erase performances of samples recorded by mistake
by specifying the sample pads and erasing the data.
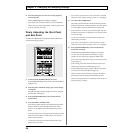
fig.r05-06
1. Press [PATTERN SELECT], and confirm that the
button has lit.
“Ptn” appears in the display.
The pad to which the pattern is assigned blinks.
* If already lit, there is no need to press the button.
* Take care to note that if [PATTERN SELECT] is not lit, the
SP-303 will proceed with sampling.
2. Press [REC], and confirm that the button has lit.
[REC] lights, and the metronome starts sounding.
3. Press the pad for the pattern whose recorded
performance you want to erase.
The pressed pad lights, and the other pad lights go out.
[REC] blinks.
4. Press [REC].
[REC] changes from a blinking to a steady light, and
recording starts.
The recorded performance is played back.
* Take care to note that pressing a sample’s pad at this time will
result in that performance being recorded.
5. Press [DEL], and confirm that the button has lit.
“ErS” appears in the display.
6. Press the pad with the sample you want to erase at the
time it is to be erased.
The dots in the display blink while the pad is held down,
and the performance of that pad is erased.
7. Repeat Step 6 as needed.
8. When you have finished erasing the data, press [DEL].
[DEL] lights go out, and the pattern returns to normal
recording mode.
* Take care to note that pressing a sample’s pad at this time will
result in that performance being recorded.
9. Press [REC].
The dots blink in the display; when the blinking stops,
deletion is finished.
Never turn off the power while the dots are blinking.
This may result in corruption not only of the pattern
currently being recorded, but may also damage other
patterns as well as the memory card.
Deleting Patterns
Specifying and Deleting a Single
Pattern
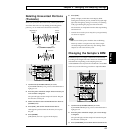
fig.r05-07
1. Press [PATTERN SELECT], and confirm that the
button has lit.
“Ptn” appears in the display.
The pad being recorded blinks.
* If already lit, there is no need to press the button.
* Take care to note that if [PATTERN SELECT] is not lit, the
SP-303 will then proceed with deletion of the sample (p. 33).
2. Press [DEL], and confirm that the button has lit.
“dEL” appears in the display.
* If there are no patterns assigned to any of the pads, “EMP”
appears in the display for several seconds, and you cannot
proceed with the deletion.
3. Press the bank button and pad to specify the bank and
pad of the pattern to be deleted.
The selected pad lights up, and [DEL] blinks.
* If you press a pad to which no pattern is assigned, nothing will happen.
* If you decide not to delete, press [CANCEL].
4. Press [DEL].
[DEL] is lit, and the dots in the display begin to blink.
When the blinking stops, deletion is finished.
Never turn off the power while the dots are blinking.
This may result in corruption not only of the pattern
currently being deleted, but may also damage other
patterns as well as the memory card.