


OPERATION
Vista Remote 2 Installation and Operations Manual
33
Remote System Operation
Connecting using a web browser
Connecting to the Vista Remote 2 from a network location or over the internet can be done two
ways; using the Built-in Java VNC Viewer or Downloading Windows VNC Viewer from the unit
and installing it on the remote computer. It is recommended that the Windows VNC viewer be
downloaded from the unit and installed on the remote computer. The VNC viewer is more
robust than the Java applet and has more functionality and features than the Java applet. If
you experience problems using the Java applet, switch to the VNC viewer application.
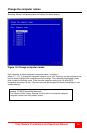
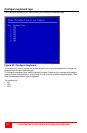
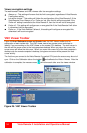
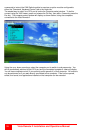
To connect to the Vista Remote 2 from any workstation, start a web browser and enter the
assigned IP address for the unit in the URL field of the browser (Example http://192.168.0.44).
The Vista Remote 2 will respond with the below three options displayed in the browser’s
window.
The first time a connection to the Vista Remote 2 is made, it is recommended that you
download the Windows VNC viewer from the unit, save it and run the VNC viewer to connect to
the unit directly. Some operating systems may request permission to run or save the program.
Save the program to the location wanted and create a desktop ICON for the program. The next
time the RealVNC viewer is needed, just click on the desktop ICON to connect.
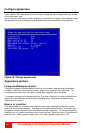
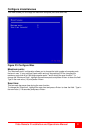
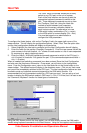
After the installation is complete, run the VNC viewer program and the VNC Viewer Connection
Details window will display. Make sure that the Server IP address is correct and the port
number is 5900. If the port number was changed during the unit configuration procedure, this
number will match that VNC port configuration number.
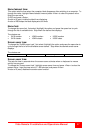
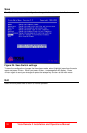
Click on “OK” to
enter your
Username and
Password
Click on the OK tab and VNC Authentication box will display. Enter the Username and
password and click OK. Upon validation, the remote connected computer’s video will display.
NOTE: If the username or password is entered incorrectly five consecutive times, the remote
user station’s IP address is locked out and remote access is denied. The lockout of an IP
address will show up in the log as IP address “Blacklisted”. (See the troubleshooting section for
the procedure to unlock the IP address)
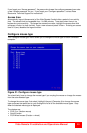
Click on the OK tab and the remote connected computer’s video will display.