


18
Chapter 2 Setup procedures
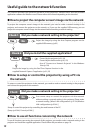
To use the projector via the networks, follow the setup procedures below.
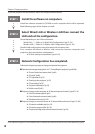
STEP 1
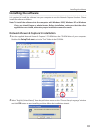
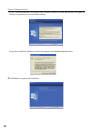
Install the software on computers.
Install the software recorded in CD-ROM on each computer which will be operated.
Read following pages of this chapter to install.
STEP 2
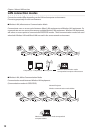
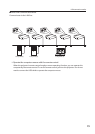
Select Wired LAN or Wireless LAN then connect the
LAN and set the configuration.
Decide depending on the LAN environment.
Wired LAN ............Refer to “4. Wired LAN Configurations” (pp.27–34).
Wireless LAN ....... Refer to “5. Wireless LAN Configurations” (pp.35–44).
Detailed LAN configurations need to be done with a browser later.
First, complete the Wired or Wireless LAN connection between computers and
projectors, then start browser configurations.
➔ “6. Basic setting and operation” (pp.45–64).
STEP 3
Network Configuration has completed.
Follow each chapter to project an image and operate the projector.
■ Operate and manage the projector ➔ “7. Controlling the projector” (pp.65-86)
➔ “Power Control and status check” (p.66)
➔ “Controls” (p.68)
➔ “PC adjustment” (p.72)
➔ “Setting up the projector” (p.73)
➔ “Timer setting” (p.76)
➔ “Projector information” (p.79)
➔ “Multi-control” (p.81)
■ Project an image on the computer ➔ “8. Network capture functions" (pp.87-110)
➔ “Use of real time capture” (p.91)
➔ “Use of network communication” (p.96)
➔ “Moderator function” (p.107)
■ Project an image on a network server ➔ “9. Network Viewer functions” (pp.113-130)
➔ “Create the available data” (p.114).
➔ “Create the program files” (p.119).
➔ “Project the image with network viewer function” (p.124)
* Even if Network Capture 5 is not installed into the computer, the wireless LAN can be set up with USB memory. (p.95)