


28
Chapter 4 Wired LAN configurations
KB3BC
Setting Procedure
Setting procedures and contents differ depending on the LAN installation location.
When installing, consult your system administrator to set up the LAN appropriately.
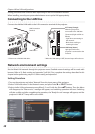
Connect the shielded LAN cable to the LAN connection terminal of the projector.
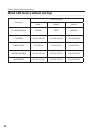
Network environment settings
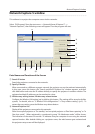
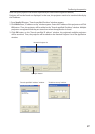
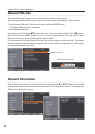
Set the Wired LAN network through the projector menu. Detailed network settings will be made with
browser. Refer to “6. Basic setting and operation” (p45-64). First, complete the settings described in this
chapter before performing steps in “6. Basic setting and operation.”
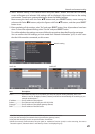
1. Turn on the projector and select “Network” from the input menu of the projector.
2. Select “LAN mode select” in the Network menu, and press Point 8 or SELECT button.
3. Select similar LAN environment among Wired1, 2 and 3 with the Point ed buttons. Then the Menu
will disappear, the “Please wait...” message will appear, and switching operation will start. Switching
will take a while and after completing the operation, the “Ready for use” message will appear, and the
projector’s LINK/ACT Lamp will be on or blink.
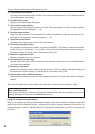
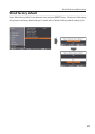
Connecting to the LAN line
LAN Cable**
LAN Connection
Terminal
* When the LAN setting is “Off”, the two lamps will not be on.
ACT Lamp (Orange)
When the projector is
connected to the 100 Base-
TX network, light or blink as
follows;
- Light when connecting to
the network.
- Blink when sending or
receiving the data.
LINK lamp (Green)
Light green when the
projector is connected to the
network.
** Please use a shielded LAN cable .