


SVP 450 PLUS - SVD 500 PLUS
15
ENGLISHENGLISH
ENGLISHENGLISH
ENGLISH
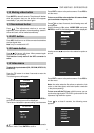
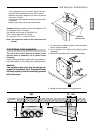
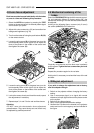
To remove the top cover completely you must unscrew
the two locking screws (B) close to the two pivots and the
other two (C) securing the jointed rod to the cover.
B
C
A
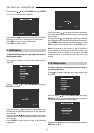
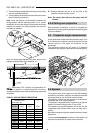
4.2.2 Removing the front panel
Unscrew the two screws (D) on the left and right of the
front panel. Unscrew the three screws (E) on the bottom
and take the panel off. The position of the screws is shown
by the arrows. To remove the front panel, press the two
tongues (F), which are located in its lower portion.
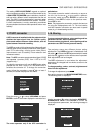
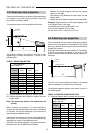
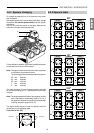
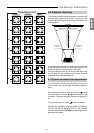
4.3 INSTALLATION TYPES
4.3.1 Installation choice
Choose one of the following possible installation
types:
••
••
•
DESK TOP FRONT projection
••
••
•
DESK TOP REAR projection
••
••
•
CEILING FRONT projection
••
••
•
CEILING REAR projection
D
D
E
F
F
E
4 INSTALLATION
4.1 INSTALLATION PROCEDURE
Qualified personnel must carefully observe the
installation procedure to install the projector and to
ensure best performances.
Note:
The projector is factory-set for front ceiling projection
with a
90”
screen, 4/3 format and a projector-screen
distance of
265 cm.
1. Choose the installation type and read the
instructions through carefully. Determine the
distance between the screen and the front of the
projector.
Determine the projection angle.
2. Remove the top and front projector covers.
3. Insert the correct spacers between lenses and
tubes.
4. Prepare and install the screen.
5. Install the projector on the floor or on the ceiling
and center the screen, maintaining the factory
deflection settings.
6. Focus carefully by adjusting the lenses.
7. If the installation type is the same as the factory
setting, go to step 11, otherwise continue.
8. Tilt the red and blue tubes until the three crosses
are superimposed.
9. Adjust the magnets.
10. Switch the projector off and disconnect the power
cable.
11. Put the cover on the video projector.
12. Carry out a fine adjustment of the picture with
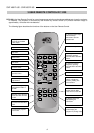
the remote control RC 3000.
4.2 Removing the cover
4.2.1 Removing the top cover
Loosen the 2 securing screws (A) and lift the cover up.