


C H A P T E R 5
Maintainingyour interactivewhiteboardsystem
36 smarttech.com/kb/170401
l
Before you clean the projector, press the Power button twice on the ECP or remote control
to put the system in Standby mode, and then allow the lamp to cool for at least 30 minutes.
l Do not spray cleaners, solvents or compressed air directly on the projector. Do not use spray
cleaners or solvents near any part of the projector because they can damage or stain the unit.
Spraying the system could spread a chemical mist on some of the projector’s components and
lamp, resulting in damage and poor image quality.
l Do not allow liquids or commercial solvents of any kind to flow into the projector base or head.
I M P O R T A N T
l When cleaning the interactive whiteboard system:
o
Wipe the exterior of the projector with a lint-free cloth.
o
If necessary, use a soft cloth moistened with a mild detergent to clean the projector
housing.
l Do not use abrasive cleaners, waxes orsolvents.
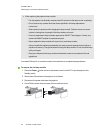
When cleaning the projector’s mirror:
l Use a bellows bulb or air blower bulb (commonly found in audio-visual supply stores) to blow off
dust. Never touch the mirror with your bare hands or a brush.
l If wiping the mirror is unavoidable, wear protective gloves and gather the cleaning cloth into a
ball. Gently run the cleaning cloth across the mirror like you would a feather duster. Don’t apply
any pressure to the lens or mirror.
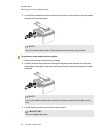
When cleaning the projector’s lens:
l Use a bellows bulb or air blower bulb (commonly found in audio-visual supply stores) to blow off
dust. Never touch the lens with your bare hands or a brush.
l If wiping the lens is unavoidable, wear protective gloves and gather the cleaning cloth into a ball.
Gently run the cleaning cloth across the lens from the center to the edge, using the cleaning cloth
like you would a feather duster. Don’t apply any pressure to the lens or mirror.
Focusing and adjusting the projector image
For information on focusing and adjusting the projector image, see Focusing the image on page 20
and Adjusting the image on page 21.