


36
Chapter 2 Menus
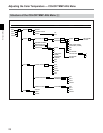
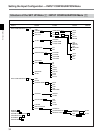
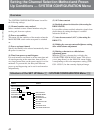
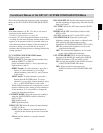
Setting the Input Configuration — INPUT CONFIGURATION Menu
[C111] COMPOSITE menu
Select the format of a composite or Y/C signal.
AUTO: The format of the input signal is detected and
switched automatically.
It will take a few seconds to detect the format of
an input signal when AUTO is selected. It is
recommended that a particular format be selected
if it is determined.
NTSC: SETUP 7.5 or 0.
PAL: S (simple) or D (delay).
PAL-M: S (simple) or D (delay).
SECAM
Notes
• Even when selecting AUTO, also select the NTSC,
PAL, or PAL-M format.
• If there is no input connector or decoder
corresponding to a format, that format will not be
selectable (the cursor will skip over that entry).
•When the BKM-21D is attached, changing the signal
format of a channel from SDI to COMPOSITE
AUTO may prevent proper display of the picture. In
this case, set the format to NTSC or PAL first, then
change to AUTO.
•When inputting the PAL-M YC signal to a channel
with the BKM-26M attached, setting the signal
format to YC AUTO may prevent proper display of
the picture. Set the format to PAL-M (S or D).
[C112] COMPONENT menu
Select the component signal format, or RGB.
YUV SMPTE/EBU-N10
YUV BETACAM: SETUP 7.5 or 0
RGB
[C113] SDI menu
Select the format of the serial digital signal.
AUTO: The format of the input signal is detected and
switched automatically.
• It will take a few seconds to detect the format of
an input signal when AUTO is selected. It is
recommended that a particular format be
selected if it is determined.
• If the serial digital signal is not properly displayed at
SDI AUTO mode, re-enter the channel number.
NTSC: SETUP 7.5 or 0
PAL: S (simpe) or D (delay)
4:2:2
[C12] YC SEP menu
Select a Y/C separation filter.
TRAP/BPF: Select TRAP/BPF filter.
2 LINES COMB: Select 2 LINES COMB filter.
3 LINES COMB: Select 3 LINES COMB filter.
[C13] SCREEN MODE menu
Select the scan size.
4:3-NORM: Overscanned 4:3 aspect ratio.
4:3-UNDR: Underscanned 4:3 aspect ratio.
16:9-NORM: Overscanned 16:9 aspect ratio.
16:9-UNDR: Underscanned 16:9 aspect ratio.
[C14] SCALE menu
Select the setting for each items of SAFE AREA
setting list.
80: Displays a 80% safe area in 4:3 screen.
90: Displays a 90% safe area in 4:3 screen.
100: Displays an 100% safe area in 4:3 screen.
16:9-80: Displays a 80% of 16:9 aspect ratio safe
area in 4:3 screen.
16:9-90: Displays a 90% s16:9 aspect ratio safe area
in 4:3 screen.
16:9-100: Displays an 100% 16:9 aspect ratio safe
area in 4:3 screen.
4:3-80: Displays a 80% 4:3 aspect ratio safe area in
16:9 screen.
4:3-90: Displays a 90% 4:3 aspect ratio safe area in
16:9 screen.
4:3-100: Displays an 100% 4:3 aspect ratio safe area
in 16:9 screen.
[C15] CHANNEL NAME menu
Give the channel a name. Select a preset name, or
enter a new one.
PROG: Program signal.
EDIT: Signal from an editor.
CAM: Camera signal.
VTR: Signal from a VTR.
NEW NAME: Enter a new name. (Up to 20
characters can be entered and up to six characters
from the head of the name are displayed in the
INPUT CONFIGURATION menu ([C1], 2/2).)