


Appendix C: Software Installation
C-7
C-4 IA64 OS Installation
For installation on an IDE hard drive.
(Note: The Itanium2 board does not have a floppy connector, so the user
cannot install Windows driver through a floppy device. This procedure
uses ramdisk to add the boot device driver in EFI so that Windows OS will
automatically pick up driver from there.)
1. Make sure that the driver for the boot device (the SCSI or RAID controller) is
supported by Itanium2.
2. Copy the ramdisk.efi and driver files into a USB device (such as a USB
pen). (A USB 2.0 device is recommended.)
3. Connect the USB device to a USB port and power on the system (see
Chapter 5 for USB port locations).
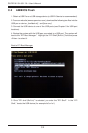
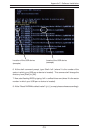
4. Once the system enters the “EFI Boot Manager,” choose “EFI Shell
[Built-in]”
5. Under the “EFI Shell,” locate the USB device (for example:
fsx, fs0 or fs1...)
6. At the Shell command prompt, type: Shell> fsX: (where X is the
number of the file in which your USB pen or device is located). This
command will change the directory from [Shell] to [fsX].
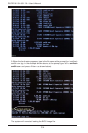
7. At the new command prompt, type fsX:\> load ramdisk.efi. This
command will create a virtual block inside the EFI, which contains an
image of all files in your USB device including the boot device driver. This
new block will be the very last block under the EFI shell. (For example,
if you previously had a total of six blocks, the virtual block will be block
seven [blk7].)
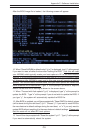
8. Type: fsX:\> exit. This command will exit allow you to exit the fsX device
and return to the “EFI Boot Manager.”
9. Select “EFI Shell [Built-in]” again.
10: At the Shell command prompt, type "Shell> copy -r blkX: blk0:". This
command will copy the images from the virtual block (in this example blk7)
to block 0 (blk0). Now your driver is ready to be used by the Windows OS.