


AOC-USAS-L8i Add-on Card User’s Manual
7-14
Follow these steps to force the synchronization of a selected array:
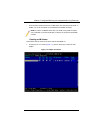
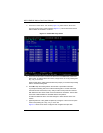
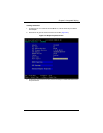
1. Select SYNCHRONIZE ARRAY on the MANAGE ARRAY screen (Figure 7-8).
2. Press Y to start the synchronization, or N to cancel it.
Activating an Array
An array can become inactive if, for example, it is removed from one controller or
computer and moved to another one. The Activate Array option allows you to
reactivate an inactive array that has been added to a system. This option is only
available when the selected array is currently inactive.
Follow these steps to activate a selected array
1. Select A
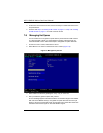
CTIVATE ARRAY on the MANAGE ARRAY screen (Figure 7-8).
2. Press Y to proceed with the activation, or press N to abandon it.
After a pause, the array will become active.
Deleting an Array
Follow these steps to delete a selected array:
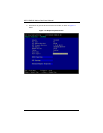
1. Select DELETE ARRAY on the MANAGE ARRAY screen (Figure 7-8).
2. Press Y to delete the array.
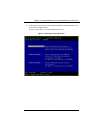
After a pause, the array is deleted. If there is another remaining array and one or
two hot spare disks, the BIOS checks the hot spare disks to determine if they are
compatible with the remaining array. If they are not compatible (too small or wrong
disk type) the firmware deletes them also.
NOTE: If there is a global hot spare disk on the controller to which you have
moved the array, the BIOS checks when you activate the array to determine if
the hot spare is compatible with the new array. An error message appears if the
disks in the activated array are larger than the hot spare disk or if the disks in
the activated array are not the same type as the hot spare disk (SATA versus
SAS).
WARNING: Before deleting an array, be sure to back up all data on the array that
you want to keep.
NOTE: After a volume has been deleted, it cannot be recovered. When an IM
volume is deleted, the data is preserved on the primary disk. When an IME
volume is deleted, the master boot records of all disks are deleted.