


Getting Started
30
AD007 User Manua l
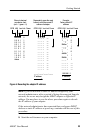
Configuring TekVISA Resources
Run the TekVISA Resource Manager Configuration program to
configure TekVISA preferences, locate, and add instruments.
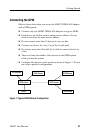
1. Right-mouse click on the yell ow VISA icon in the Taskbar
notification area to display a pop-- up menu. This icon was
installed as part of the TekVISA installation. If this icon is not
present, select Start > Programs > TekVISA > TekVISA
Configuration and wait for the icon to appear in the Taskbar
notification area.
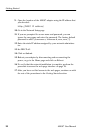
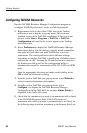
2. Select Preferences to display the TekVISA Resource Manager
Preferences dialog. Use the dialog to specify which communica-
tion ports and how often you want TekVISA to search for
instruments. The search preferences have different settings
depending on whether TekVISA is installed on a Windows-based
oscilloscope or a PC. Pressing the Default Preferences button on
the Preferences dialog will set the configuration utility to
automatically search for instruments on RS-232, LAN and GPIB
ports.
Once the appropria te selections are made on this dialog, select
OK to close the Preferences dialog.
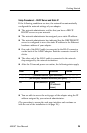
3. From the yellow TekVISA icon pop-up menu, sele ct Refresh to
refresh connec ted instrument information.
4. From the yellow TekVISA icon pop-up menu, sele ct
Configure... to display the TekVISA Resource Manager
Configuration dialog. Wait until the message Status: Ready is
displayed in the lower left corner.
5. Check that the instrument you want to communicate with is listed
in the TekVISA Resources field. If the LAN-conne cted
instrument with which you want to communicate is not listed, do
the following steps to add an instrument to the Remote Host List: