


Remote Operation
Select Remote Control Function
62 Operating Manual for XPR Series Power Supply
Resistive programming is selected at rear panel switch S1: S1-1 and S1-2 are ON.
Remote
Analog
Programming
Procedure
1. Turn the power supply OFF.
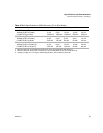
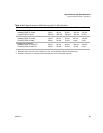
2. Set switches S1-1, S1-2, S1-3, and S1-4 according to the programming sources
that you are using, as indicated in Figure 1.5, on page 22 and Table 1.2, on page
23. See Table 4.3, on page 63 for more information about switch settings.
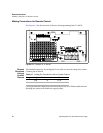
3. Connect the programming source(s) to the mating J1 connector as indicated in
Figure 1.5, on page 22 and connect the correct polarity for voltage sources.
Ensure that the mating connector is plugged securely into the rear panel
connector.
4. Set the programming sources to the desired levels and turn the power supply ON.
The LCL LED turns off and the RMT LED turns on. Adjust the external
programming source to change the power supply’s output.
!
CAUTION
Before turning on the power supply in resistive programming mode, make sure
that the resistors are connected at J1-1 to J1-3 and J1-2 to J1-3.
!
CAUTION
To maintain the isolation of the power supply output and prevent ground loops,
use an isolated (ungrounded) programming source when operating the power
supply via remote analog control at the J1 connector.
!
CAUTION
The remote programming inputs are internally referenced to the supply’s
negative output. Do not connect control ground (J1 terminals 3 or 6) to the
supply's positive output.