


Scanning Overview
Xerox 6204 Wide Format Solution 81
Scan
4
Scanning Overview
This section describes the scanning procedure, and assumes that a mailbox has
already been set up. Listed below are the steps involved in the scanning process.
Step 1 Selecting a Mailbox............................................................................................................... 81
Step 2 Selecting Features................................................................................................................ 82
Step 3 Scanning the Document........................................................................................................ 83
Step 4 Importing Scanned Data ....................................................................................................... 84
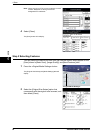
Step 1 Selecting a Mailbox
You must specify the destination of the scanned image data before scanning can begin.
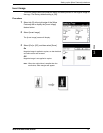
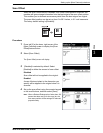
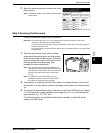
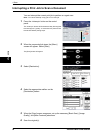
1 Press the <Scan> button.
Note: You also can display the [Scan] screen by selecting
[Scan] on the [Menu] screen.
The [Scan] screen will display.
2 Select [Destination].
The [Destination] screen will display.
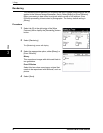
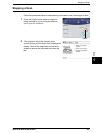
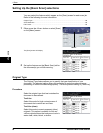
3 Either select an existing mailbox or create a new
mailbox to store the image file(s).
In the example at the right, mailbox 01 is set up
already, while mailboxes 02 - 05 are not in use.
Note: Refer to "Creating a Mailbox" (P.104) to learn how to
set up a new mailbox.
Note: You may select [ ] to display the previous screen or
[ ] to display the next screen. You also can access
a mailbox by entering its two-digit number in [Go to],
using the numeric keypad, and then selecting [Go].
<Scan>