


ExpWave 240B Secure Outdoor Ethernet Radio Link
12-10 Firmware & Configuration File Maintenance
After the firmware upload process has completed, the ExpWave will automatically restart.
12.4.10 Uploading Configuration File Via Console Port
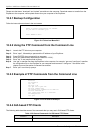
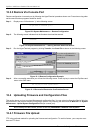
Step 1. Select 2 from Menu 24.7 – System Maintenance – Upload Firmware to display Menu 24.7.2 - System
Maintenance - Upload System Configuration File. Follow the instructions as shown in the next screen.
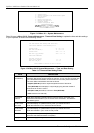
Figure 12-18 Menu 24.7.2 as seen using the Console Port
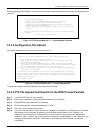
Step 2. After the "Starting Xmodem upload" message appears, activate the Xmodem protocol on your computer.
Follow the procedure as shown previously for the HyperTerminal program. The procedure for other serial
communications programs should be similar.
Step 3. Enter “atgo” to restart the ExpWave.
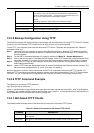
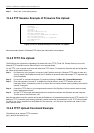
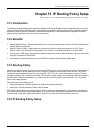
12.4.11 Example Xmodem Configuration Upload Using
HyperTerminal
Click Transfer, then Send File to display the following screen.
Figure 12-19 Example Xmodem Upload
After the configuration upload process has completed, restart the ExpWave by entering “atgo”.
Menu 24.7.2 - System Maintenance - Upload System Configuration File
To upload system configuration file:
1. Enter "y" at the prompt below to go into debug mode.
2. Enter "atlc" after "Enter Debug Mode" message.
3. Wait for "Starting XMODEM upload" message before activating
Xmodem upload on your terminal.
4. After successful firmware upload, enter "atgo" to restart the
system.
Warning:
1. Proceeding with the upload will erase the current
configuration file.
2. The system’s console port speed (Menu 24.2.2) may change
when it is restarted; please adjust your terminal's speed
accordingly. The password may change (menu 23), also.
3. When uploading the DEFAULT configuration file, the console
port speed will be reset to 9600 bps and the password to
"1234".
Do You Wish To Proceed:(Y/N)
Type the configuration file’s
location, or click Browse to
search for it.
Choose the Xmodem protocol.
Then click Send.