


12 CHAPTER 2: INSTALLING THE V7122 MEDIA GATEWAYS
The following main sequential steps need to be performed for installing
the V7122:
1 Unpack the V7122 (see Unpacking).
2 Check the package contents (see Package Contents).
3 Mount the V7122 (see Mounting the V7122).
4 Cable the V7122 (see Cabling the V7122).
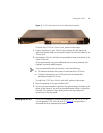
After powering-up the V7122, the Ready and LAN LEDs on the front
panel turn to green (after a self-testing period of about three minutes).
Any malfunction changes the Ready LED to red (see
Monitoring the
V7122 Chassis LEDs for details on the V7122 LEDs).
Once you have completed these hardware installation steps, you can
begin configuring the gateway (see
Configuring the V7122 Media
Gateways).
Unpacking Follow the procedure below for unpacking the box in which the V7122 is
delivered.
To unpack the V7122, perform these steps:
1 Open the carton and remove packing materials.
2 Remove the V7122 unit from the carton.
3 Check that there is no equipment damage.
4 Check, retain and process any documents.
5 Notify 3Com or your local supplier of any damage or discrepancies.
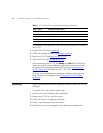
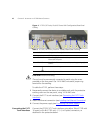
7 ETH Ethernet LED indicators
8 -- Reset button
9 -- cPCI LED indicators
10 -- Power and Fan LEDs
11 -- An available cPCI slot for an optional third-party CPU board
Table 2 V7122 Front View Component Descriptions (continued)
Item Label Component Description