


Cabling the V7122 15
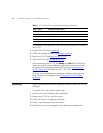
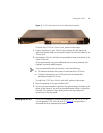
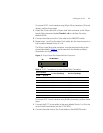
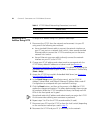
Figure 3 V7122 Front Panel with 19-inch Rack Mount Brackets
To attach the V7122 to a 19-inch rack, perform these steps:
1 Position the device in your 19-inch rack and align the left-hand and
right-hand bracket holes to the required holes in the vertical tracks of the
19-inch rack.
2 Use standard 19-inch rack bolts (not provided) to fasten the device to the
frame of the rack.
3Com recommends using two additional rear mounting brackets (not
supplied) to provide added support.
If you are assembling the rear brackets, note the following:
■ The distance between the screws on each bracket is 26.5 mm.
■ To attach the brackets, use 4-40 screws with a maximal box
penetration length of 3.5 mm.
To install the V7122 on a 19-inch rack shelf, perform these steps:
1 Place the gateway on the pre-installed shelf.
2 You’re now recommended to perform the optional steps of fastening the
device to the frame of the rack (as described above) while it is placed on
the shelf. This prevents it from sliding when inserting cables into
connectors on the rear panel.
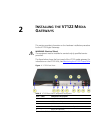
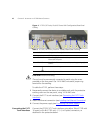
Cabling the V7122 The V7122 is available in various configurations (i.e.,16-, 8-, 4-, 2-, or
1-trunk gateway). The 16-trunk dual AC (
Figure 4) configuration is
illustrated here as a representative product.