


Configuring the V7122 Basic Control Protocol Parameters 27
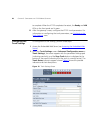
5 Enter the Proxy name in the field Proxy Name. If Proxy name is used, it
replaces the Proxy IP address in all SIP messages. This means that
messages are still sent to the physical Proxy IP address but the SIP URI
contains the Proxy name instead.
6 Configure Enable Registration to Yes or No:
■ Disable = the V7122 does not register to a Proxy server/Registrar
(default).
■ Enable = the V7122 registers to a Proxy server/Registrar at power up
and every Registration Time seconds.
7 Select the coder (i.e., vocoder) that best suits your VoIP system
requirements. The default coder is: G.723.1 30 msec.
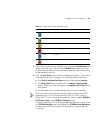
8 Map outgoing calls to IP addresses (when Proxy isn’t used) by completing
these steps:
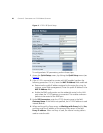
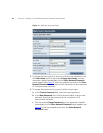
a Click the arrow button next to the Tel to IP Routing Table label; the
Tel to IP Routing screen opens.
Any telephone number whose destination number matches the prefix
defined in the Destination Phone Prefix field and whose source
number matches the prefix defined in the adjacent Source Phone
Prefix field, is sent to the IP address entered in the IP Address field.
b Click the Submit button; the Tel to IP Routing table is automatically
updated.
c Click Quick Setup; you’re returned to the Quick Setup screen.
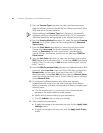
9 Enable E1/T1 B-channels by completing these steps:
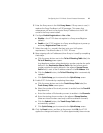
a Click the arrow button next to the Trunk Group Table label; the
Trunk Group Table screen opens.
b Select the number of the trunk you want to enable from the Trunk ID
drop-down list.
c Enter the number of B-channels you want to enable in the Channels.
d Enter the starting phone number in the adjacent Phone Number
(these are virtual numbers used only to define enabled B channels).
e Click the Submit button; the Trunk Group Table table is
automatically updated.
f Click Quick Setup; you’re returned to the Quick Setup screen.
10 Click the Reset button, and then at the prompt click OK; the V7122
applies the changes and restarts. This takes approximately three minutes