


30 CHAPTER 3: CONFIGURING THE V7122 MEDIA GATEWAYS
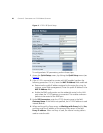
5 From the Protocol Type drop-down list, select the required protocol.
Note that different trunks can be defined with different protocols (CAS or
ISDN variants) on the same gateway.
When modifying the Protocol Type field, the menu is automatically
updated according to the selected protocol (ISDN, CAS or Transparent).
Additional parameters are appropriate to the selected protocol type.
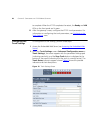
6 From the Framing Method drop-down list, select the required Framing
Method (for E1 trunks, always set the Framing Method to Extended
Super Frame).
7 From the Clock Master drop-down list, select the trunk clock source.
Choose either Recovered (the clock is recovered from the trunk --
default) or Generated (the trunk’s clock source is provided by the
internal TDM bus clock source, according to the parameter TDM Bus
Clock Source).
8 From the Line Code drop-down list, select the line code. Choose either
B8ZS (bipolar 8-zero substitution) for T1 trunks only; HDB3 (high-density
bipolar 3) for E1 trunks only; or AMI (alternate mark inversion, used for
both T1 and E1).
9 From the ISDN Termination Side drop-down list (applicable only to ISDN
protocols), select User Side when the PSTN or PBX side is configured as
Network side, and vice versa. If you don’t know the V7122 ISDN
termination side, choose User Side and then open the Channel Status
screen (by clicking the Home button). If the D-channel alarm is indicated,
choose Network Side.
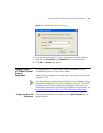
10 To configure the different behavior bits, either enter the exact
hexadecimal value of the bits in the field to the right of the relevant
behavior parameter, or directly configure each bit field by completing the
following steps:
a Click the arrow button (-->) to the right of the relevant behavior
parameter; the relevant behavior screen appears.
b Modify each bit field according to your requirements.
c Click the Submit button to save your changes.
11 After modifying the parameters:
■ To apply the changes to the selected trunk only, click the Apply Trunk
Settings button.
■ To apply the changes to all the trunks, click the Apply to all Trunks
button.