


2-2
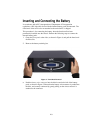
Installing the Unit
The S20BLK may be installed on a flat, solid surface or rack-mounted.
Proper placement of the S20BLK should be accomplished in accordance with the
following procedures:
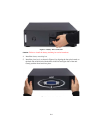
Installing the Unit on a Flat Surface
Place the unit on a solid, flat surface that is capable of supporting at least 60 lbs.
Note: Avoid placing other components directly on top of or behind the unit.
Leave at least one inch of space on all sides to allow for proper air
ventilation. Do not block the fan.
Rack Mounting the Unit
If the S20BLK unit is to be rack-mounted, please follow these four basic steps:
Note: The rack-mounting hardware that is shipped with the unit is designed for
19-inch wide racks only.
1. Install the rack-mount rails. (See the installation sheet located in the box
containing the rack-mount rails.)
2. Install the rail cleats. (See the installation sheet located with the cleats in the box
marked “Accessories.”)
3. Install rack-mount ears. (Optional — See the installation sheet located with the
cleats in the box marked “Accessories.”)
Note: Rack-mount ears are required only if you want to lock the unit to the
front of the rack to prevent front to rear movement.
Caution: Rack-mount ears should not be used alone to support the unit. Rack-mount
rails should always be used to support the unit’s weight when it is mounted
in a rack.
4. Slide the unit into the rack so that the cleats mounted on the side of the unit fit
within the track of the rack-mount rails. If the ears were mounted, screw the
mounted ears into the rack to lock the unit into position. (See the installation
sheet located in the box marked, “Accessories.”)
Note: Avoid placing other components directly on top of or behind the unit.
Leave at least one inch of space on all sides to allow for proper air
ventilation. Do not block the vents or fan.