


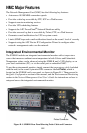


B-5
Control Console
Once you log onto the control console, as described in either the Local (Serial)
Access, or ARP and Telnet Access section above, perform the following steps:
1. Choose Network from the Control Console menu.
2. Choose TCP/IP from the Network menu.
3. Disable BOOTP (if it is enabled), and select Accept Changes.
4. Set the System IP, Subnet Mask and Default Gateway address values, and select
Accept Changes. (The changes take effect when you log off.)
5. Press
CTRL-C to exit to the Control Console menu.
6. Click Log out to have the changes take effect.
BOOTP
You can use an RFC 951-compliant DHCP or BOOTP server to configure the
TCP/IP settings required for the NMC.
1. Enter the management card’s MAC and IP addresses.
2. Enter the Subnet Mask and Default Gateway settings, and then enter an optional
Bootup File Name in the BOOTPTAB file of the BOOTP server.
Note: Look on the back of the S20BLK unit for the MAC address; see Step 3
below for more detailed information about using a Bootup file.
3. When the management card reboots the BOOTP server it provides the server with
the TCP/IP settings.
– If you specified a Bootup File Name, the management card will attempt to
transfer that file from a TFTP or FTP server residing on the BOOTP server.
The management card will assume all the settings specified in the bootup
file.
– If you did not specify a Bootup File Name, the management card can be
configured remotely by using Telnet, or the Web interface: User Name and
Password are both apc by default.
Note: To create a bootup file, see your BOOTP server documentation.