


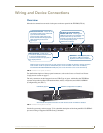
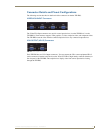


Wiring and Device Connections
14
TPI-PRO Total Presentation Interface - Pro Edition
The two USB connectors on the rear of the TPI-PRO are used to provide signals from a keyboard and/or
mouse. The Type-B USB connection on the TPI-PRO is used for communication between the TPI-PRO
and the computer.
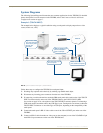
You can control a computer by routing the Mouse control through the TPI-PRO and displaying the
results on a CRT or non-touch enabled panel. In this scenario, the TPI-PRO is virtually non-existent as it
is akin to connecting the monitor and mouse directly to the rear of the computer.
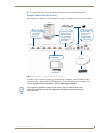
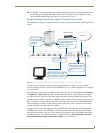
The computer views the TPI-PRO as an adapter connected to a USB mouse device (as seen in FIG. 9).
Follow these steps to configure the TPI-PRO for mouse pass-thru control:
1. Discharge any acquired static electricity by touching a grounded metal object.
2. Disconnect any incoming power connector from the rear of the TPI-PRO.
3. Connect a USB mouse to one of the Type-A USB ports on the TPI-PRO unit.
4. Connect a USB cable from a USB connector port (on the computer) to one of the Type-B USB
device port input connectors on the rear of the TPI-PRO unit
.
5. Connect an HD-15 cable from the rear video port (on the computer) to the VGA/RGB 15-pin male
HD-15 input connector on the rear of the TPI-PRO unit that corresponds to the Type-B USB port to
which you connected the USB cable in step 4.
6. Connect the monitor’s HD-15 video cable to one of the VGA OUTPUT port on the rear of the
TPI-PRO.
7. Cycle power the unit. Cycle powering the unit allows it to detect the new configuration.
8. Code a button on the touch panel page to enable the pass-thru feature on a selected source input.
Refer to the
^PPS section on page 120 for the specific command parameters to enable the pass-thru
command. Toggling this coded panel button can enable/disable the pass-thru feature.
9. Setup the TPI-PRO output resolution using the procedures in the Setting the Output Resolution on
the TPI-PRO section on page 26.
Using a USB hub may cause functionality issues with all USB ports on the TPI-PRO.
AMX recommends you do not use a USB hub to connect multiple USB devices to the
TPI-PRO.
USB 2.0 support is required for all USB devices.
Removing and reconnecting USB devices from the TPI-PRO front panel may result in
a loss of connectivity. If this occurs, resetting the unit will allow the devices to
re-establish connectivity.
When disconnecting a USB device, please wait 5-10 seconds before reconnecting or
connecting a new device to allow the TPI-PRO to recognize that the first device is
disconnected. If connectivity is lost, reset the TPI-PRO to allow re-establishment of
the connection.
Pass-thru must be enabled when using control devices that are connected to the
USB connectors on the rear of the TPI-PRO unit.
You first must set the TPI-PRO to match the resolution of the computer’s video output
resolution, and then you must adjust the TPI-PRO to fit the available screen on the
CRT monitor. It is possible the image generated from the TPI-PRO could be slightly
"off", in which case you should adjust the image using the CRT’s on-board video
adjustment buttons.
If the TPI-PRO is turned off and then has power re-applied (power cycling), video
alignment settings established through the Video and/or RGB pages could be reset
unless the adjusted values have been previously saved. Refer to the
Video Settings
Page section on page 54 for more information.