


7Click Advanced Properties.
8Click the Monitor tab and then click Change.
9If your monitor is listed in the dialog box that appears, click its name, click OK, and then
go to step 13. If not, click “Have Disk” and go on to step 10.
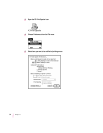
10 Insert the
PC Compatibility Card–PC Utilities
CD. Make sure the path in the text box is
E: \ APPLE; then click OK.
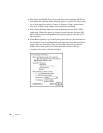
11 Click Show All Devices.
12 In the Models box, choose a model corresponding to the monitor type listed in the PC
Setup control panel. Then click OK.
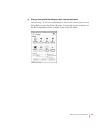
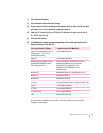
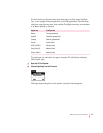
If this type is listed in PC Setup... ...choose this type in the Models box
Apple 14" (this type appears if you’ve “(all other Apple monitors)”
connected a 12-, 13-, or 14-inch
fixed-frequency monitor)
Apple 16" “(all other Apple monitors)”
Multiscan (this type appears if you’ve Plug and Play Monitor (VESA DDC) if this type is
connected an AppleVision or other automatically selected in the list. Otherwise,
DDC-compliant monitor) AppleVision 1710
AV
, AppleVision 1710,
AppleVision 1705, Multiple Scan 1705, or
Multiple Scan 20.
Multiscan 14" Apple Multiple Scan 14" or Apple Multiple Scan 15"
Multiscan 17" Apple Multiple Scan 17"
Multiscan 20" Apple Multiple Scan 20"
19" Color Your monitor model (if listed), or SuperVGA 1024 x 768
Portrait “(all other Apple monitors)”
21" Color “(all other Apple monitors)”
21" Monochrome “(all other Apple monitors)”
VGA Standard VGA 640 x 480
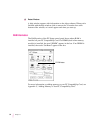
To custo m i ze a multiple-scan monitor, click the Adjustments tab in the
Display control panel.
31
Setting Up the PC Environment